Showing posts with label bread. Show all posts

Thursday, July 8, 2021

sloppy veggies.


My husband likes simple foods so sometimes our meals consist of homey casseroles and quick dishes. I like fancier plates so even the humble sloppy joe gets a little something something added to the meat! I mean, who doesn't like a fancy sandwich?

As I've never really grown up eating this particular dish, I went and googled a few recipes until I found one that I really liked. I loved the idea of adding loads of vegetables in the meat. Thankfully this was husband approved and is part of our regular rotation.

---- o o o o ----

Very Veggie Sloppy Joes
(adapted from Simply Delicious)

2.5lbs ground beef
1 large onion, finely chopped
2 large leeks, washed and finely chopped*
3 large carrots, peeled and finely chopped*
2 celery spears, finely chopped
1 can mushrooms, drained, chopped
1 tbsp minced bottled garlic
1 tsp minced black garlic (optional)
1 1/2 tbsp Chili powder
1 tbsp brown sugar
1 1/2 Tbsp smoked paprika 
1 tsp paprika
1 1/2 tsp ground cumin
1 tsp garlic powder
1/2 tsp onion powder
1 tsp salt
1 tsp pepper
1 tsp ground coriander
3/4 tsp cloves
1 tsp yellow mustard
2 tins chopped tomatoes
2 tbsp Worcestershire sauce
1 small can tomato paste
1 8oz can Tomato sauce
1 tsp beef bullion
salt & pepper to taste

*For even more veggies:
Substitute 1 leek and 1 carrot for: 1 zucchini, 1/2 bell peppers, 1/4 cup of Italian parsley.

soft kaiser rolls or onion hamburger buns, toasted
grated cheese
finely chopped lettuce (optional)


Fry the onion, leeks, carrots and celery until soft and fragrant, about 10 minutes. 

Add the mushrooms and garlic and fry for another 5 minutes before adding the spices and ground beef.  Cook until beef has browned then add tomatoes and tomato paste. 

Allow to simmer for 5 minutes then add beef stock and sugar.

Reduce the heat and allow to simmer for 30-45 minutes covered.

If the sauce looks very watery, remove the lid from the pot and turn up the heat. Allow to simmer for 15 minutes uncovered until the sauce has reduced slightly. Season to taste.

Serve the mince on the toasted bread with some grated cheese.


Tuesday, October 1, 2019

tamale all about it!

I love me some tamales! But the only thing is that I don't have the time (or rather kind of lazy) to make tamales on my own. Even though it's not authentic, I find that pot pies that mimic tamales are something that I can definitely do.

Since I like the ease of making casseroles, this tamale pie was something they've been wanting to make. I've been experimenting with different ingredients inside the pie and so far this is the most of that been happy with. It's got a lot of feeling and as much vegetables I can fit in. Add some extra toppings and this makes a great meal!
---- o o o o ----
Chicken Tamale Pie
(makes one large pot)

Filling:
4lbs skinless boneless chicken, cubed
1 tbsp olive oil
1 tbsp bottled minced black garlic
1 tsp chili powder
1 tsp paprika
1 tsp Jen's everything seasoning
1/2 tsp ground cumin
1/2 tsp ancho chile powder
1/2 tsp onion powder
1/2 tsp pepper
1/2 tsp salt
2 bay leaves
1 large onion, diced
1 large poblano chile, diced
1 can black beans, drained & washed
1 can sweet corn, drained
1 medium zucchini, diced
1/4 cup finely chopped cilantro, divided
1 large can Las Palmas mild/medium enchilada sauce
1 tsp better than bouillon, chicken bouillon​
2 tbsp masa flour

Cornbread Topping:
Dry Ingredients
    2 cups  cornmeal
    1 cup all-purpose flour
    2 tsp baking powder
    1/2 tsp Himalayan pink salt
Wet Ingredients
    2 cups milk (room temperature)
    2 tsp organic apple cider vinegar
    5 tbsp salted butter (melted/liquid)
    1 small can chopped jalapenos, drained 
    1/4 cup canned corn

1/4 cup Mexican cheese blend
sour cream for serving
finely chopped red onion for serving
hot sauce for serving

Heat 6 quart dutch oven. Mix chicken, black garlic, and spices then add to hot pan to brown. Add onions and poblano and cook until onions are translucent. Add black, beans, corn, zucchini, and half of cilantro. Cook for 10 minutes then add enchilada sauce, bouillon, and masa flour. Cook mixture until thickened and reduced by 1/4. Remove from heat set aside.

Preheat oven to 350F degrees.

Combine together wet ingredients for cornbread in a small bowl until frothy.  In a separate bowl, mix dry ingredients together.  Combine wet ingredients with dry ingredients and mix until just combined. Top filling with cornbread mixture then with Mexican cheese blend. Bake in oven until cornbread is cooked through and filling is bubbly, about 30-35 minutes.

Serve with sour cream, finely chopped onions, olives, and hot sauce.

Sunday, March 13, 2016

light and filling.


Roasted Vegetable Hummus Plate: Just a quick dinner with roasted eggplant and butternut squash on light, creamy hummus. A dash of sumac and parsley then drizzled generously with olive oil. Add some sliced naan and a simple salad to the side and you have yourself a mighty tasty dinner indeed.

Thursday, February 25, 2016

blackened, not burned.


Holy. Crap. I think that this may be the BEST fish sandwich that I've ever made. Talk about crazy delicious, this was a spicy, tangy, savory explosion of flavor in my mouth and I am so sad that it's all gone. You should really make this . . . like, RIGHT. NOW.

I came across this fish sandwich when I was looking to try out the blackened seasoning I made. I recently went to Safe Harbor Seafood Market and Restaurant down in Jacksonville and had their famously fantastic blackened shrimp nachos. Wow, were those nachos super tasty! I was going to do a food hack of the nachos, but unfortunately I didn't have the right ingredients to remake it.

What I did have was some ciabatta bread and a few frozen flounder fillets. Sounds like blackened fish sandwiches to me. :)


When I was looking for the perfect sandwich recipe, I wanted mainly one thing: no mayo in the slaw. This recipe was perfect. I liked that it was colorful and the red cabbage slaw was vinaigrette based. Also, I was able to utilize two of the seasonings I had in my cupboard; the blackened seasoning I just made and adobo seasoning.

Speaking of adobo seasoning, I had made mine (a mixture of these two recipes) before trying the McCormick's version. I did NOT like McCormick's version at all. I think it was the taste . . . it seemed off and not at all what I was expecting it to be. Whenever I have Mexican adobo sauce, it's usually more red than yellow and the homemade mix came closer to what I was used to. I had to throw the bottle of McCormick's adobo seasoning away. :/

On a happier note, the seasoning mixes worked well in this particular recipe. I've switched out the seasoning that the fish originally had with equal parts blackened seasoning. For the chipotle mayo, I subbed out the canned chipotles with dried ground ones and the adobo sauce for the seasoning. I don't usually have canned chipotles in adobo sauce in the pantry and I've found that this makes an acceptable substitute. Everything else pretty much stayed the same.

I'm telling you . . . these are the best fish sandwich EVAR.

---- o o o o ----
 

Blackened Fish Sandwich with Red Cabbage Slaw and Chipotle Mayo
(barely adapted from Daydream Kitchen)

For the Slaw:
1 small garlic clove, finely chopped
1/2 small red onion, finely chopped
1½ tbsp white balsamic vinegar
1 tbsp extra virgin olive oil
sea salt
freshly ground black pepper
1 cup finely shredded red (or purple) cabbage
¼ cup thinly sliced, 1-inch strips of green bell pepper (“matchstick” sized)
¼ cup coarsely chopped cilantro
1 scallion, thinly sliced (white and green parts)

For the Chipotle Mayo:
2½ tbsp light mayonnaise
1/4 tsp dried chipotle pepper flakes
1/2 tsp adobo seasoning

For the Sandwich:
2¼ tsp blackened seasoning
1 tsp olive oil
2 5-oz skinless fish fillets, about ⅓-inch thick (cod, salmon, flounder, etc . . .)
2 crusty sandwich rolls, halved and lightly toasted

 
Make the slaw:
Combine the garlic, shallots, and vinegar in a small bowl. Whisk in the olive oil and season with salt and pepper.

Combine the cabbage, bell pepper, cilantro, and scallion in a medium bowl. Add the dressing and toss well to combine. Taste for seasoning and add more salt and pepper, as needed. Cover and refrigerate 30 minutes to allow flavors to combine.

Make the mayo:
Combine the mayonnaise, chipotle pepper, and adobo sauce in a small bowl. Set aside. (Alternately, you can substitute sour cream or greek yogurt for a lighter dressing.)

Make the sandwich:
Rub the blackening seasoning all over the fish, coating both sides well and pressing to adhere. Heat a nonstick skillet over medium-high heat and add the olive oil. When the oil is hot, but not smoking, season the fillets with salt and add to the pan.

Sear until beginning to blacken on the bottom, about 3 minutes. (Reduce the heat to medium if the spices begin to burn.) Turn and sear the second side until blackened and the fish is just cooked through, about 2 minutes longer, depending on thickness.

To serve, spread the chipotle-mayo sauce on all 4 cut sides of the rolls and lay a filet on each bottom half. Mound the red cabbage slaw on top of the fish and cover with the top halves. Serve right away.

---- o o o o ----
 

Blackened Seasoning
(from Mom-Makes . . .)

2 1/4 tsp sweet paprika
2 1/4 tsp smoked paprika
1 tbsp garlic powder
1 tbsp onion powder
1 tbsp dried thyme
1 tsp ground black pepper
1 tsp dried basil
1 tsp dried oregano
1/2 to 1 tsp cayenne pepper

 
Combine the paprika, garlic powder, onion powder, thyme, black pepper, cayenne pepper, basil, and oregano in a food processor or spice grinder and pulse until finely ground and evenly mixed. Alternately, sift ingredients into a bowl and whisk until well combined. Store in an airtight container in a cool, dry place. Keeps up to 6 months.

---- o o o o ----
 

Adobo Seasoning
(adapted from Food. and Lemon Chiffon Cake)

1 tbsp lemon pepper seasoning
1 tbsp garlic powder
1 tbsp onion powder
1 tbsp dried oregano
1 tbsp parsley flakes
1 tbsp achiote powder
1 1/4 tbsp kosher salt
1 1/2 tsp ground cumin
1 tsp sweet paprika
1/2 tsp smoked paprika
1/2 tsp ancho chile powder
1/4 tsp turmeric powder

 
Combine all ingredients in a food processor or spice grinder and pulse until finely ground and evenly mixed. Alternately, sift ingredients into a bowl and whisk until well combined. Store in an airtight container in a cool, dry place. Keeps up to 6 months.

Wednesday, January 20, 2016

rollin' for breakfast.


I had some leftover ready-made pizza dough sitting in the fridge so I decided to try and make some breakfast rolls this morning. I was tempted to make something sweet, but the need for a savory breakfast in the morning decidedly won out. Plus, the recipe sounded interesting and I was in the mood for eggs anyway.

Reading through the recipe, this seemed simple enough. I decided to add more spices and onion to the filling to make these rolls more flavorful. I didn't have any breakfast sausage so I swapped it with some thick-sliced deli ham. Then, all I did was roll out the dough, layer on the fillings, and bake that sucker for 30 minutes. Yum!

I do wish my rolls were more big and fluffy, though. But that's more my fault than anything, really. If I had used a similar dough like the kind called in the recipe, I'm sure I would've gotten big, fluffy rolls as well. As for the taste, they were pretty good! Nice and savory especially with all that onion added in. I do wish that I had more cheese in these rolls, though, so next time I'm doing the full one cup. So would I make these again? Definitely!

---- o o o o ----
 

Breakfast Rolls
(adapted from The REAL Housewives of Riverton)

1 pkg ready-made pizza dough
4 eggs
1 tbsp milk
1/4 cup Italian parsley, chopped
1/2 tsp garlic powder
1/2 tsp onion powder
1/4 tsp paprika
salt and pepper, to taste
1 clove garlic, minced
1 small onion, chopped
1/2 green pepper, chopped
2 to 3 slices ham, chopped
1/2 to 1 cup shredded cheese
olive oil

 
Preheat oven to 400F degrees.

In a bowl or a glass measuring cup, combine egg, milk, parsley, and spices. Season with salt and pepper, to taste, and beat together until well combined. Set aside.

In a large skillet, drizzle some olive oil and saute garlic, onion, and bell pepper until slightly browned. Pour egg mixture over the contents of the pan. Let the eggs cook for up to a minute or until the bottom starts to set, then flip by sections. Repeat the flipping every few seconds until the eggs are firm but still moist. Remove from heat, transfer to a plate, and set aside.

Roll out dough to 1/4 inch thick rectangle. Sprinkle on egg mixture, chopped ham, and shredded cheese. Roll tightly, pinching the ends together, then cut into even 12 sections with a sharp knife. Transfer to a well greased pan and bake for 20 to 30 minutes until golden brown.

Makes 12 rolls.

Tuesday, January 5, 2016

taste it and make it: bulgogi sandwich!


When the hubby and I were still in Guam, there were a few eateries we found that got into our usual meal rotation. Our top three were definitely Katre's Bistro, Pika's Cafe, and surprisingly, Dr. Kabob (a Greek fast food joint). Pika's Cafe, though, would probably be the best "farm-to-table" restaurant the island has. Their moto and menu revolved around the phrase, "Buy local, eat local, support local!".

With that, Pika's Cafe also had a revolving seasonal special and a bunch of unique items on their standard menu. The hubby's favorite was definitely their Korean BBQ Sandwich. In the past month, I've heard the hubby lament several times on the loss of acess to that particular sandwich. Every time we passed the Asian isle on the grocery store, he would comment with "I miss Pika's" . . . which meant the sandwich, of course, lol.

I figured I'd give him a surprise!

Enter, my version of the Korean BBQ Sandwich! Since he was missing the sandwich so much, I thought that I would try and replicate the sandwich as close as I could. I knew that it had bulgogi marinated beef, with kimchi-style pickled vegetables, and cucumbers. It also had a chili mayonnaise.

Knowing was half the battle . . . It's the execution that was the problem. In mine, I decided to sub the beef with chicken. It was lighter than beef (I wanted to get away from heavy foods for the time being) and I thought it would be easier to marinate. Also, I didn't have any beef in the fridge anyway which was another big factor, lol.
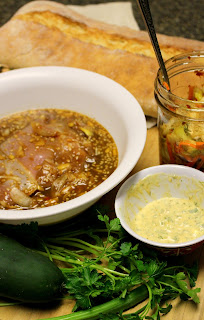

For the marinade, I decided to go with this recipe but adapted it slightly to include minced apples and sliced onions. From what I read on the web, one of the traditional ingredients to add was either Korean pears or kiwi. Well, since I had neither, I subbed with Golden Delicious apples instead (since that was what I had in the pantry). After making the chicken, I ended up with quite a bit of marinade left. I decided to cook it down and made it into a sauce for the chicken afterwards.

The kimchi recipe was something that I was pleasantly surprised to find. I thought that I would have to put my ingenuity to the test, but apparently someone had already used theirs. I love that this uses regular cabbage and ingredients I already had on hand ("emergency kimchi" indeed!). In traditional kimchi, a coarse ground red pepper called gochugaru is commonly used. However, I've also seen a few recipes call for a fermented chili paste called gochujang to be used instead of the gochugaru. Well, I decided to go with the flavor notes of the gochujang since this would be quickly pickled to be used the next day. That way, I would have the taste of a long fermented kimchi without actually waiting. :)

During the taste testing, I found that this kimchi had a lot of heat to it. So, I nixed the chili mayo that I was originally going to make. Instead, I decided to use some of the leftover chimichurri, mixed with some ketchup and mayo, to make an aioli out of that (secret sauce, baby!). It has a lot of acidity so I thought it would help imitate the "pickled" part of the sandwich. With the ciabatta, kimchi, chicken bulgogi, aioli, and cucumbers all ready to go, my sandwich was ready to be assembled!

This turned out better than I hoped! It had the same savory, sweet, and spicy flavors the Pika's sandwich had. The only drawback was that the sandwich was messy to eat. The chicken made the whole thing a little bulky and the "take-and-bake" ciabatta bread I bought was a tad bit too chewy. The sauce made from the marinade also made this messy, but I think it wouldn't be the same without it. And the kimchi? Everywhere.

Next time, to reduce the messy factor, I'll get a softer ciabatta and cut the bread so it'll envelope the fillings more. Also, I'll toss the chicken in the sauce first and shake off any excess. That way, I'll still get some of the sauce on the chicken. But man, this was one of my favorite experiments!! Oh, by the way, the hubby LOVED the sandwich. Although it wasn't Pika's Cafe's Korean BBQ Sandwich, he thought it was a damn good substitute. :D Now, back to the drawing board . . .

---- o o o o ----
 

Korean Chicken Bulgogi
(slightly adapted from Meg's Everyday Indulgence)

2 to 3 pcs boneless chicken thighs

For the Marinade:
1/2 a Korean pear, apple, or kiwi, minced
1/2 a small onion, thinly sliced
3 tbsp soy sauce
1 tbsp lemon juice
1 tbsp brown sugar
1 tbsp honey
1 tbsp rice wine, mirin, or cream sherry
1 tbsp sweet chili sauce
1 tbsp sesame oil
1 tbsp minced garlic
1 tbsp white vinegar
1 tsp grated ginger
1 tsp toasted sesame seeds
1/4 tsp black pepper

 
Mix the marinade ingredients in a bowl until the sugar has dissolved. Add chicken and toss well to coat. Cover and marinate for a minimum of 30 minutes up to overnight in the fridge.

To cook, preheat a skillet over medium high heat. Add the chicken, reserving the marinade. Cook until chicken is cooked through and slightly caramelized, taking care not to burn. If needed, add the reserved marinade by tablespoon when the pan gets dry. Garnish with sliced scallions and toasted sesame seeds. Serve with a side of kimchee.

---- o o o o ----
 

Quick Emergency Kimchi
(slightly adapted from Maangchi)

2 lbs green cabbage, cut into thin 2-inch strips
1/2 a small onion, thinly sliced
1 cup cold water
1/4 cup kosher salt
1/3 cup hot pepper flakes
1/4 cup fish sauce
1/4 cup minced garlic
1/3 cup (3 to 4 stalks) chopped green onion
1/4 cup julienned carrots
1 tbsp sugar
1 tbsp soy sauce
1 tsp ginger

 
Place cabbage in a large bowl and add cold water and kosher salt. Mix well with hands to properly salt cabbage. Set aside for 10 minutes. Make a paste with the remaining ingredients.

After the cabbage has soaked, wash and rinse the salted cabbage in cold water a couple of times then drain well. Return the cabbage to the bowl and mix the paste into the cabbage thoroughly.

Put the finished kimchi into a container, jar, or plastic bag. Press the top of the kimchi down with your hands to protect from exposure to too much air.

Refrigerate for at least 30 minutes before serving or eat right away like a salad. Alternately, keep at room temperature a few days to ferment if desired.

Sunday, December 6, 2015

leftover remix: ham eggs benedict!


Thankfully, our ham this year was considerably smaller than last year's, so that made ham leftovers manageable. Last year, we had to throw out about a third of the ham before it went bad. Besides sandwiches and snack meat, I had a hard time finding ways to use up one of our thanksgiving favorites.

Surprisingly, I found out that we didn't really eat ham outside of the sandwich realm. We went through the turkey a whole lot faster than we did the ham! So, to reduce the inevitable waste we were going to have with a twenty pound ham (for TWO people!!), I got creative with adding it into soups, casseroles, pasta, sides, breakfast, lunch, and dinner. When all was said and done, we threw away about a third of the ham.

With all that experimenting, I forgot to make something that should have been a no-brainer for breakfast: eggs benedict! So this year, I made sure to whip up my favorite breakfast and make it a little fancy. For this thanksgiving remix, I topped english muffins with a generous schmearing of smokey chipotle mustard, a couple slices of farm fresh tomatoes, some creamy avocado, a few pieces of ham, a couple of perfectly poached eggs, and topped it off with my favorite mock hollandaise sauce.

Best. Breakfast. EVER.

Tuesday, November 10, 2015

thinking inside the box.


Yesterday, the hubby and I went grocery shopping together. To me, that was quite extraordinary considering he hates going to the store. Well, let me amend that statement: He hates grocery shopping with me. Apparently he's an "in-and-out" kind of guy and I'm a "browser and a peruser". In other words, I take a long time shopping for groceries.

Okay, sure. I'll give him that. I'm one of those people who go down every isle, regardless if I need anything from there, just to see if there's anything new or if I happen to remember an item I forgot to jot down on the list. I make a basic list of necessities then make up my weekly menu as I walk along the store. Inefficient? Sure . . . But it's so much more creative and fun this way! That line of reasoning still doesn't negate the fact that he hates going with me.

However, on this occasion, he happened to walk by the seasonal isle and grabbed a box of roll mix and casually suggested, "You should make some caramel rolls." Hummm. Oh-kay. Suuuuure. That shouldn't be so hard . . . I mean, I've already made some cinnamon rolls before, after all.

How hard could it be??

Well I forgot that making those cinnamon rolls were a pain in the ass. AND, not to mention that I still have to tweak that recipe. The filling itself was a mess and ROLLING that thing was even worse. I thought I would do better with the boxed mix.

Turns out, I had about the same difficulty with the boxed mix as I did making it from scratch.. Except that it was reverse . . . The filling was easier to work with and had okay results, but the dough was SOOoooo sticky. I guess I could've added more flour to the dough, but I didn't want to risk it getting tough and chewy. I was aiming for soft cinnamon rolls. So I stretched the super sticky dough until it wasn't as gluey then added just enough flour so I could transfer it to a bowl to rest.

Rolling the thing was also a nightmare. Because the dough was sticky, any flour that I added got sucked right in. My "genius plan" of putting it on wax paper didn't work, so rolling wasn't as tight as I wanted it to be. *sigh* All in all, this wasn't too bad. The final product turned out as soft as I was expecting it to be. I also tried experimenting with putting some caramel on the bottom, but since the buns were loosely rolled, all the filling drained to the bottom. :/

So, my solution was to dribble some dulce de leche on top. On hindsight, I should've bought the squeeze bottle kind instead for easier drizzling. All in all, not too bad. Just some user error that's easily fixed. I may buy another box just to keep handy in case I want to try this out again. Next time, definitely more flour.

---- o o o o ----
 

Dulce de Leche Cinnamon Rolls
(barely adapted from Pillsbury)

For the Dough:
1 pkg Pillsbury Hot Roll Mix
3 tbsp sugar
1 cup hot water (120 to 130F degrees)
2 tbsp butter, softened
1 egg, room temperature

For the Cinnamon Filling:
1 cup firmly packed brown sugar
1/3 cup all-purpose flour
1/2 cup butter, softened
1 1/2 tbsp ground cinnamon

For the Caramel Topping:
1/4 cup or more dulce de leche
toasted pecans, optional

 
Make the dough:
Line 13 x 9-inch pan with aluminum foil, extending foil over edges of pan. Combine flour and yeast packets from hot roll mix with sugar in large bowl. Stir in hot water, softened butter and egg until dough pulls away from sides of bowl. Knead dough on lightly floured surface 5 minutes or until smooth, using additional flour as needed. Cover with large bowl; let rest 5 minutes.

Make the cinnamon filling and rolls:
Using a fork combine brown sugar, flour, softened butter and cinnamon in a small bowl. Roll dough to 15 x 10-inch rectangle on lightly floured surface. Crumble cinnamon mixture evenly over dough. Starting with 10-inch side, roll up tightly, pressing edges to seal. Coat foil in pan with no-stick cooking spray. Cut dough into 12 slices. Place cut side down in prepared pan. Cover with plastic wrap and towel. Heat oven to 375°F. Let rise in warm place (80° to 90°F) 30 minutes or until doubled in size.


Uncover dough. Brush rolls with 1 tablespoon of half-and-half, if desired. Bake 20 to 25 minutes or until golden brown. Brush rolls again with remaining tablespoon of half-and-half, if desired. Using edges of foil, remove rolls from pan.

Add dulce de leche topping:
Drizzle dulce de leche onto warm buns to desired amount. As an optional garnish, top with toasted pecans before serving.