Showing posts with label fruit. Show all posts

Friday, February 5, 2016

pear-fectly nuts.


Expectation: Making a breathtakingly beautiful but simple cake that looks exactly like the picture.
Reality: Not following directions and adding this and that and getting a cake that looks "okay"

I guess that's an insane thing to think, especially since I din't even follow the directions. I'm just one of those people that looks at a perfectly good recipe and says, "that's good, but what if I . . .". And that, as they say, is that.

But despite the substitutions and everything, the directions were surprisingly a little hard to follow. While it's stated in very simple terms, I'm more of a detailed baker. How much am I supposed to stir it? Do I whisk the dry ingredients together first then add it to the batter? How am I supposed to put the pear on it? Directions like that would've definitely helped.


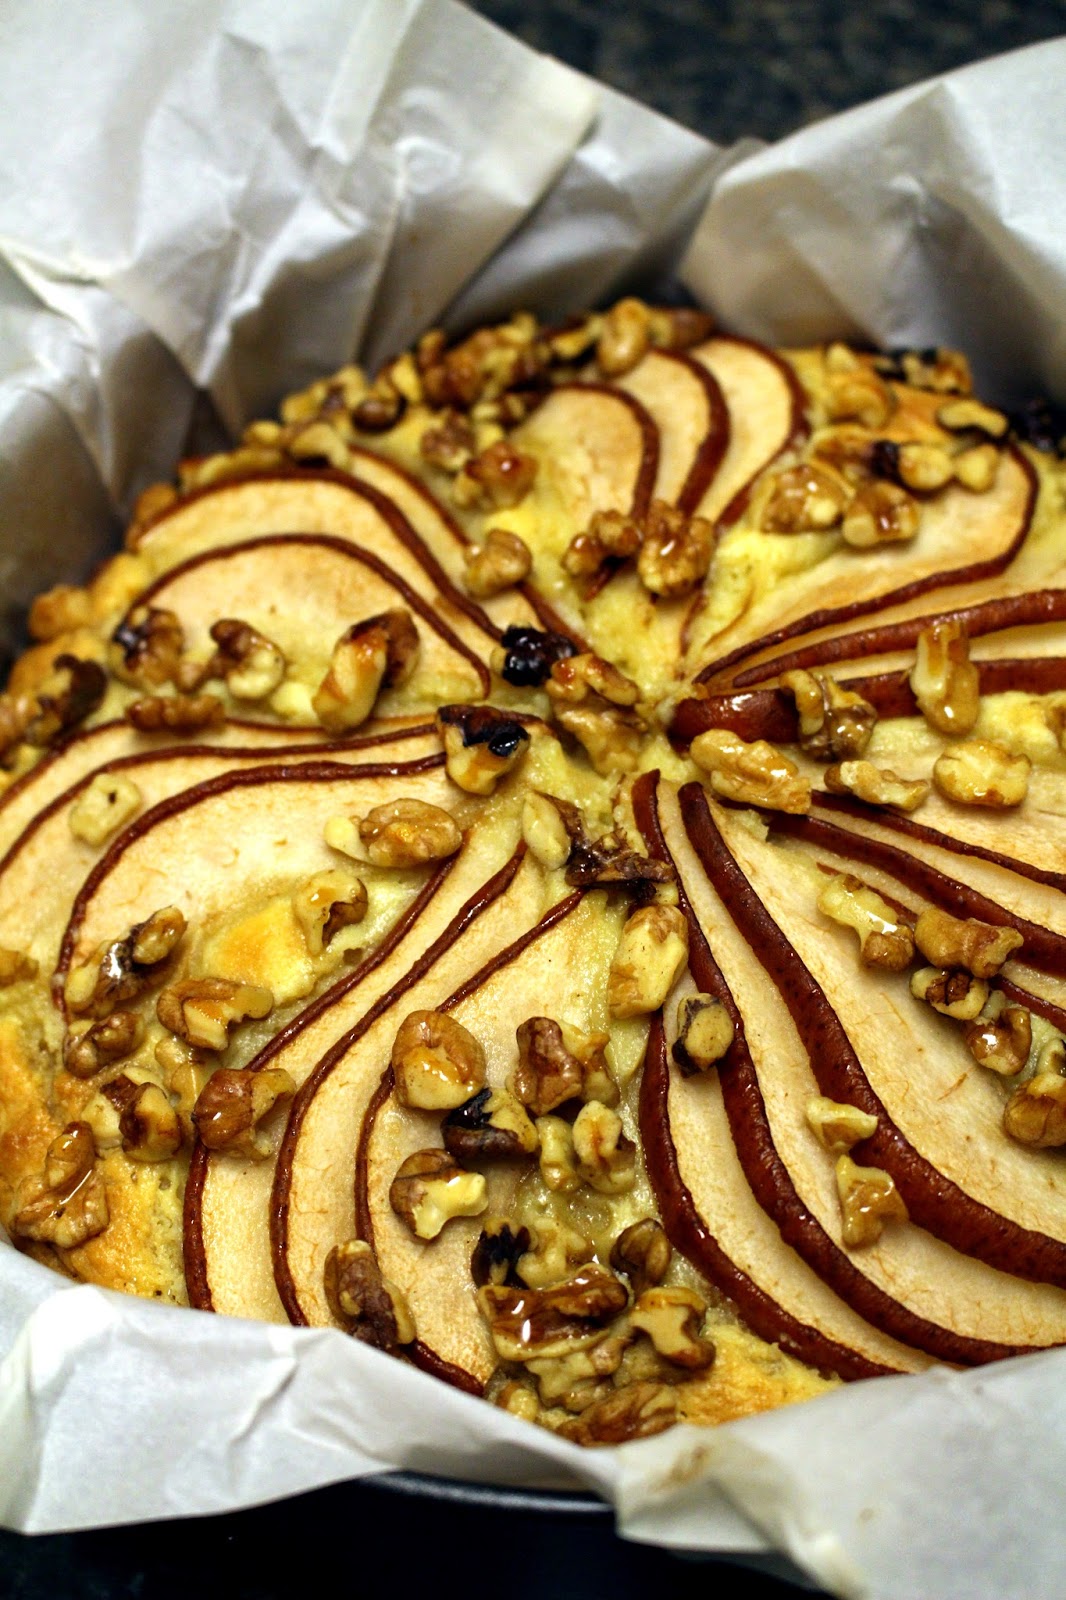
While the directions did say to peel the pears first, I figured that leaving the skin on would be okay. I should've listened to the directions. Cutting into the cake was a little hard and the skins pulled slices of pears from the top of the cake. Also, I found that one thinly sliced pear was enough for the topping. Where she put the other pear is beyond me.

Regarding sweetness, this was a lightly sweetened cake. I knew that this wasn't going to be sweet enough for me, so I decided to pour some honey on top to not only add sweetness, but also to caramelize the nuts and pears since they didn't seem to be sinking into the batter like it showed in the picture. But again, this was probably the substitutions at work.

When all was said and done, this didn't turn out too bad. I served this with some additional honey, a dusting of powdered sugar, and some sweetened whipped coconut cream. Below is the "next-time-I-make-this" recipe adaptation:

---- o o o o ----
 

Pear Walnut Cake
(slightly adapted from Tartelette)

2 large eggs
1/2 to 3/4 cup granulated sugar
3/4 cup good quality olive oil
1 cup plain, low-fat or whole milk yogurt
zest and juice of a lemon
2 cups all-purpose flour
2 teaspoons baking powder
1/4 tsp salt
1 large pear, peeled and thinly sliced
1/3 cup walnuts, chopped
1/4 cup honey, warmed
powdered sugar, for garnish

 
Preheat oven to 350F degrees and line a 9-inch baking pan with parchment paper sprayed with a little cooking spray.

In a large bowl, whisk together the eggs and sugar for about 2 minutes until light and lemon-colored. Add the olive oil, yogurt, lemon juice and zest and whisk again so that everything is well mixed. Add flour, baking powder and salt and mix just until the batter is smooth. Do not over mix.

Pour the mixture in the prepared baking pan. Place the pear slices on top, slightly diagonal and pressing gently into the cake, then sprinkle with the walnuts. Bake for about 40-45 minutes or until a toothpick inserted in the middle comes out free of crumbs. In the last 20 minutes of baking, drizzle the honey on top of the cake and return to the oven to finish baking.

Let cool completely before slicing and dusting with powdered sugar. Serves 8.


Saturday, March 7, 2015

not one...but two.


When I was in my late teens, I thought that I would get older and live by myself in an awesome apartment in a cute little trendy, hipster neighborhood. That was also about the time that I started getting interested in cooking. With that expectation in mind, I wanted to be ready and make sure that I could survive out there by my self. I tried to save money, started doing things for my own, and bought a cookbook to ready for my journey.

Well, that expectation didn't turn out the way I thought it would. Instead, I stayed home with my parents up until I met my husband. I did things for myself, but I was still depending on my mom to do my laundry. Also, I rarely made food...limited to only cakes, cookies, and the occasional experimental curry (I made a bomb-ass sandwich, tho!).

When me and the hubby started dating, I found that slowly but surely, I started living with him. I learned to be more independent but I never really got to live by myself. I mean, I still got to live in an awesome apartment in a cute little trendy, hipster neighborhood, but it was with someone else. I felt like I skipped a grade in life, somehow, and advanced to the next stage in life: living with my significant other and getting married.

Do I regret not having the chance to live by myself? Sometimes. But I think the trade off is much more better than the one missed opportunity. And instead of cooking for one, I get to cook for two...for me and for the love of my life. :) He's a much better guinea pig and his feedback helps so much when I'm cooking something...especially if it's for the first time. Like this recipe. Verdict? Well, it might not look pretty, but it's a keeper!

---- o o o o ----
 

Pork with Apple and Sweet Potato Mash
(from Family Circle Step-By-Step: Cooking for One)

1/2 green apple, unpeeled
2 tbsp (30g) butter
1 leek, thinkly sliced lengthways
1/2 tsp soft brown sugar
2 tsp oil
1 (0.5lbs/200g) pork fillet, trimmed
1 cup (100g) orange sweet potato, cubed
1 tsp all-purpose flour
2 tsp dijon mustard
1/3 cup (100ml) cream
2 tsp snipped fresh chives
1-2 tsp milk

Core the apple and cut into 6-8 slices. Melt half the butter in a frying pan and add the leek and sugar. Cook for 2-3 minutes, then add the apple and cook for 5 minutes, or until the leek and apple are golden brown. Set aside and keep warm. I used half a fuji apple here and sliced it thin, making them about coin-sized pieces instead of large rings.

Heat the oil in the same pan and cook the pork over medium heat for 3-4 minutes each side, or until cooked through. Remove from the pan, cover with foil for 5 minutes and then cut on the diagonal into thick slices. For the pork, I used a center-cut pork chop and seasoned it with garlic powder, onion powder, paprika, salt, and pepper.

Place the orange sweet potato in a saucepan of water, bring to a boil, then reduce the heat and simmer for 5 minutes, or until tender. I only had white so I used that. Added a bit of salt to the water as well.

Combine the flour and mustard in a small bowl, then add the cream. Add to the frying pan and cook, stirring, until bubbling and slightly thickened. Add the pork and chives and stir until warmed through. Season. When I was making the roux, I also added honey, sage, and paprika before adding the cream.

Drain the sweet potato when just tender. Add the remaining butter and enough milk too moisten, season and mash with a fork or masher. To serve, arrange the pork over the leek and apple and spoon on the sauce. Serve with the sweet potato mash and steamed vegetables of your choice. For the mash, I seasoned it with salt, pepper, and a little bit of onion powder.

Wednesday, March 4, 2015

vintage bread.


I don't think I'm a banana kind of gal. Whenever I buy bananas, there always seem to be a lot left from the bunch. Even if I buy three pieces, the last two just seem to stay in the fruit basket for days on end. Usually, I end up freezing them before they start to rot. Even then, I only use a little bit banana in my smoothies...I find that using a lot makes them a tad too thick for my liking.

So, since I went grocery shopping about a week ago and grabbed a small bunch of bananas on impulse, I was left with some bananas that were turning a bit brown. A lot brown, actually. I actually put them in the fridge to delay the inevitable. Alas, they still turned before I even got to touch them. *sigh*

I took this opportunity to make some banana bread.


Since they were so brown, I wanted to try this recipe that I saved. It was a recipe from 1933 that the author of the website slightly doctored up. It didn't look too complicated...simple ingredients with straightforward instructions. I think the main reason that I wanted to make it was the name. "Black Bananas" seemed like an interesting thing to use, lol.

So how did it turn out? It was okay. Not too sweet and a little buttery. I used only half the bananas suggested and left out the nuts, so that may have affected the outcome. Also, my bananas weren't quite black yet so It wasn't so banana-ey as I hoped they would be. What I really liked was the texture of the bread. It was nice and soft and almost spongey...liked good quality sliced bread.

Would I make it again? Maybe...I think next time I'll swap out half the white sugar with brown and add some vanilla extract for added flavor. In the meantime, here's the original recipe...

---- o o o o ----
 

Vintage Black Banana Nut Bread
(from Bake This Bread!)

1 1/2 cups mashed bananas from dark-skinned ripe bananas (about 4 to 5 large)
1/3 cup unsalted butter, room temperature
2 cups all-purpose flour
1 cup sugar
1 teaspoon baking soda
1 teaspoon baking powder
1 teaspoon salt
1 teaspoon dried cultured buttermilk (optional)
1/2 cup fine-chopped walnuts (substitute pecans or favorite nuts)
2 eggs, fork beaten
1 Tablespoon fresh lemon juice (from 1 large lemon)
1/3 cup milk (2% is fine)
1 to 2 Tablespoons room temperature butter for basting the top of the bread

Preheat the oven to 350f degrees.

Measure out into a large bowl the flour, sugar, baking soda, baking powder, salt, and dried cultured buttermilk (optional). Whisk dry ingredients thoroughly. Whisk the fine-chopped nuts into the dry ingredients. Set aside.

Stir the eggs into the mashed bananas and then stir in the lemon juice. Stir the banana-egg-lemon mixture into the dry ingredients. Stir in the butter. Pour in and stir the milk until thoroughly incorporated (about 30 strokes). Do not overmix.


Pour all the batter into one pan if using a large loaf pan (the batter should reach to about 2/3 full if it’s all going into one pan) or two smaller pans. Place in oven and bake for about 75 minutes, if using larger bread pan. For the smaller pans, bake for about 65 minutes. Since oven differences can impact the baking time, check on your cakes beforehand. The banana bread will be done when it is somewhat cracked on top, the sides pull away slightly from the edges, a toothpick tests shows clean, the bread springs back a bit when gently pressed at the top center point and the internal temperature reaches about 210 degrees.

Cool the bread for 10 minutes in the pan before brushing the top of the bread with the remaining butter. Serve bread warm from the oven or after a one-day (or more) counter sitting time.

Wednesday, December 24, 2014

christmas time.


Merry Christmas!

It's weird being on a tropical island where it's always the same temperature all year round. At least when I was living in San Diego, there was *some* climate change. Here, the only way that i can tell that the seasons are changing is by the amount of rain fall that we have. Speaking of San Diego, it dawned on me that this will be the very first time in my entire life that I'm away from my family during the holidays and I have to say that it sucks! And to put the cherry on the cake, this would've been the very first Christmas that the hubby and I would have as a husband and wife except that he has work today...meaning I won't see him until *after* Christmas. *que charlie brown sad song here* Lol.

Well, that won't do. Today's itinerary? Take that cherry and bake it in a bread! :D

I wanted to make something festive and this recipe caught my eye. It's just so nice and *pink*! When I actually started to make the cake, however, I spied the box of dark cocoa on the shelf and thought, "Hn....chocolate cherry bread....". So I decided to experiment and tweaked the recipe a little bit to add the cocoa. Then I saw cream that was going to expire within the next few days, and I threw that into the batter too (I rationalized with myself that cream was needed since i was using skim milk, lol).

So what did I get? A lesson in glazing, first of all. My technique leaves much to be desired. Next time, I think I'll do a little less juice so that i'll have a nice thick glaze. Following the recipe gave me a runny glaze that I had to pour on the bread over and over again. Taste-wise...rich, decadent, and almost cake-y. The glaze adds a nice touch of almond flavor without having the crunch of the almonds. Since I only had one bottle of cherries, I found that I really wanted it to stud the bread a little bit more. Definitely 2 bottles next time. And the chocolate? Who doesn't like chocolate??

Chocolate Cherry Almond Bread
(adapted from Tastes of Lizzy T's)

Bread:
1/2 cup milk*
1/4 cup cream*
1/2 cup oil
1 egg
3/4 to 1 cup sugar
1 1/2 cups all-purpose flour
1/2 cups whole wheat flour
1/2 cup dark cocoa powder 1 tbsp baking powder
1/2 tsp kosher salt
1/2 cup semi-sweet chocolate chips (optional)
2 (10 oz) jar maraschino cherries

Glaze:
2 cups powdered sugar
2 tbsp melted butter
1/2 tsp almond extract
1/4 to 1/3 cup maraschino cherry juice

Preheat the oven to 350 degrees.

In a medium bowl, stir together the milk, cream, oil and egg. In a separate bowl, combine the sugar, flours, cocoa powder, baking powder, salt, and chocolate chips (if using). Add the dry ingredients to the wet ingredients and stir until just combined (little streaks or clumps of flour is okay).

Drain the maraschino cherries, reserving the juice for the glaze. Coarsely chop the cherries in a food processor or with a knife. Gently fold the cherries into the batter.

Pour the bread batter into a greased or parchment lined 9"x5" bread pan. Bake at 350 degrees for 1 hour or until a toothpick inserted in the center of the bread comes out clean. Allow the bread to cool for 10 minutes, then remove the bread to a wire rack to cool completely.

To make the glaze, combine the powdered sugar, melted butter, and almond extract in a small bowl. Add just enough cherry juice to make a thick glaze. Mix until it is smooth. Once the bread is cool, spread the glaze on top of the bread. Let stand 15 to 30 minutes to set then slice and serve.

*You could probably substitute half and half or all milk. I haven't tried it so I don't know how that'll come out. More experimenting! :D

Thursday, December 18, 2014

preserving persimmons.


so after eating a whole bunch of persimmons, i think i've been a little persimmoned out. i still had about 15 very ripe fruits left and i though i'd try my hand at making some jam or preserves. this recipe seemed easy enough, so i adapted a little bit and changed it here and there.

i used about 9 to 10 persimmons in my recipe. after debating for a hot minute, i decided to go through the "preserves" route...leaving the fruit semi-chunky. that meant that i didn't have to strain the pulp, and therefore reducing one step in the process. yay for laziness! then i slowly reduced it for over two hours and added a box of pectin that was dissolved in some water at the end. i let it boil, cooled to room temp, then stored it in the freezer. easy-peasy, if not a little time consuming making all that pulp. it did taste awesome with the persimmon bread though! would i try this again? maybe. probably with sweeter persimmons next time.

Persimmon Freezer Preserves
(adapted from Epicurious Community Table)

4 cups persimmon puree (i used 8 to 9 very ripe fuyu persimmons)
1 cup white granulated sugar
1/4 cup light brown sugar
3 tbsp lemon juice
dash of cinnamon
1 tsp kosher salt
1 box fruit pectin
3/4 cup very hot water

Stir the fuyu persimmon puree, sugars, lemon juice, cinnamon, and salt together in a large pot and let the mixture cook, over medium-low heat, until reduced by half (about 2 hours). Stir constantly to prevent the bottom from burning.

in a microwave safe bowl, heat the water on high for three minutes until it comes to a boil. Remove carefully and add the pectin gradually, stirring to prevent clumping. Once all of the pectin has dissolved, add to the puree mixture and stir. Increase heat and let come to a boil for about 3 to 5 minutes. Remove from heat.

Ladle the preserves into clean jars, leaving 1/2 inch of headspace to allow for expansion during freezing. Once the jars are filled, put the lids on and let the preserves stand at room temperature for 30 minutes, then place in the freezer. Defrost in refrigerator before using.

Note: If keeping in the fridge, this will keep for about two weeks. If keeping in the freezer, preserves will keep for about a year.

Monday, December 15, 2014

persimmon schtick...


i'm in a persimmon schtick. having tried pudding last week, i thought i'd try my hand at making a quick bread this time around. this one was recently bookmarked on my pinterest board, despite it being two years old. i looked over the ingredients list this morning and decided to give it a shot.

man, i'm so glad i tried this recipe! it's nice and sweet and even though the whole thing is spiced with nutmeg (a spice i don't normally like), i found that it's used brilliantly in this bread! actually, the taste reminds me of eating pumpkin bread or christmas fruitcake. either way, this was fantastic and is a nice addition to the collection of seasonal recipes in my repertoire.

for this recipe, i did end up making a few changes (namely halving the recipe and swapping the liquor). i used overly ripe fuyu since i only had that on hand. i also changed out the whiskey for dark spiced rum...more my preference than necessity. didn't bother toasting the pecans too, i figured "recipe ready" was alright. also, did an almost 1:1 ratio of whole wheat and all-purpose flour. the result? it's got a nice nutty flavor, thanks to the pecans and whole wheat flour. the raisins and chopped dates stayed nice and evenly dispersed with the help of a flour coating. and the rum? well, rum makes everything all the more festive for this time of year! ;)

Persimmon Rum Bread
(adapted from Putney Farm)

1 cup all-purpose flour
3/4 cup whole wheat flour
3/4 tsp kosher salt
1 tsp baking soda
1/2 tsp ground nutmeg
1 cup white granulated sugar
1/2 cup melted unsalted butter, cooled
2 extra large or large eggs, lightly beaten
1/3 cup spiced dark rum
1 cup persimmon puree (i used 2 very ripe large fuyu persimmons)
1 cup pecans (i used the ones labeled "recipe ready")
1 cup or so dried fruit (i used a mix of chopped whole dates, golden raisins, and regular raisins)

Preheat oven to 350 degrees. Grease and flour or line loaf pan with a piece of parchment paper.

Mix flour, baking soda, salt, nutmeg and sugar into a large mixing bowl. Reserve 1/4 cup of the flour mixture in a separate small bowl. Toss in the dried fruit in the reserved mixture, making sure to coat each piece well.

Make a well in the center of the dry ingredients and then stir in the butter, eggs, liquor, persimmon puree, pecans and floured dried fruit (note: you want to add any leftover flour that the fruit was tossed in as well...waste not, want not!). Mix the batter just until combined (having little streaks of flour is okay...don't over mix).

Pour the batter into the loaf pan and then place the pan in the oven. Bake 1 hour or until toothpick inserted into the center comes out clean. Allow to cool completely in the pan before serving.