Showing posts with label lunch. Show all posts

Tuesday, October 1, 2019

tamale all about it!

I love me some tamales! But the only thing is that I don't have the time (or rather kind of lazy) to make tamales on my own. Even though it's not authentic, I find that pot pies that mimic tamales are something that I can definitely do.

Since I like the ease of making casseroles, this tamale pie was something they've been wanting to make. I've been experimenting with different ingredients inside the pie and so far this is the most of that been happy with. It's got a lot of feeling and as much vegetables I can fit in. Add some extra toppings and this makes a great meal!
---- o o o o ----
Chicken Tamale Pie
(makes one large pot)

Filling:
4lbs skinless boneless chicken, cubed
1 tbsp olive oil
1 tbsp bottled minced black garlic
1 tsp chili powder
1 tsp paprika
1 tsp Jen's everything seasoning
1/2 tsp ground cumin
1/2 tsp ancho chile powder
1/2 tsp onion powder
1/2 tsp pepper
1/2 tsp salt
2 bay leaves
1 large onion, diced
1 large poblano chile, diced
1 can black beans, drained & washed
1 can sweet corn, drained
1 medium zucchini, diced
1/4 cup finely chopped cilantro, divided
1 large can Las Palmas mild/medium enchilada sauce
1 tsp better than bouillon, chicken bouillon​
2 tbsp masa flour

Cornbread Topping:
Dry Ingredients
    2 cups  cornmeal
    1 cup all-purpose flour
    2 tsp baking powder
    1/2 tsp Himalayan pink salt
Wet Ingredients
    2 cups milk (room temperature)
    2 tsp organic apple cider vinegar
    5 tbsp salted butter (melted/liquid)
    1 small can chopped jalapenos, drained 
    1/4 cup canned corn

1/4 cup Mexican cheese blend
sour cream for serving
finely chopped red onion for serving
hot sauce for serving

Heat 6 quart dutch oven. Mix chicken, black garlic, and spices then add to hot pan to brown. Add onions and poblano and cook until onions are translucent. Add black, beans, corn, zucchini, and half of cilantro. Cook for 10 minutes then add enchilada sauce, bouillon, and masa flour. Cook mixture until thickened and reduced by 1/4. Remove from heat set aside.

Preheat oven to 350F degrees.

Combine together wet ingredients for cornbread in a small bowl until frothy.  In a separate bowl, mix dry ingredients together.  Combine wet ingredients with dry ingredients and mix until just combined. Top filling with cornbread mixture then with Mexican cheese blend. Bake in oven until cornbread is cooked through and filling is bubbly, about 30-35 minutes.

Serve with sour cream, finely chopped onions, olives, and hot sauce.

Tuesday, December 13, 2016

for cozy winter days...


So, after a little bit of hiatus, I'm back!

Since it's been a while, I figured that I'd post with something warm and cozy for the winter months . . . a hearty turkey meatball soup! I found this recipe off Pinterest while I was looking for something to do with kale. Kale is one of those random ingredients that I occasionally buy but never really know what to do with. That's when looking for recipes come in handy. ^_^;

For the soup, I decided to add my own twist to it by including some dried pasta. Again, I wanted a really hearty soup and this was going to be used for more of a lunch/dinner type of entree. I also changed the taste profile...the cumin and the star anise seemed really weird to me so I omitted them in my soup.

All in all, the ending result was nice...savory and lemony, hearty and filling like I wanted it. Add a couple slices of toasted and buttered sourdough and his was the perfect good eats for a cold day. This does make a big pot of soup, so be prepared to have leftover for a couple of days! Enjoy!

---- o o o o ----

Lemony-Garlic Turkey Meatball Soup with Pasta and Kale
(adapted from The Holisitc Ingredient)

For the Meatballs:
1 lbs. ground turkey
2 tbsp bread crumbs
1/2 cup finely chopped leeks, white part only
handful fresh Italian parsley, finely chopped
1 tbsp dried mint leaves, crumbled
1 tbsp fresh thyme leaves
1 tsp bottled minced garlic
zest of 1 lemon
1/2 tsp salt
1/2 tsp pepper
1 tsp olive oil
additional oil for cooking

For the Soup:
1 medium onion, diced
3 ribs celery, diced
1 large carrot, diced
5 peels of lemon
1 tbsp minced bottled garlic
1 tbsp fresh thyme leaves
12 cups (3 quarts) low sodium chicken broth
2 tsp fish sauce
1 (6.5oz) pkg dry cheese tortellini pasta
10-12 kale leaves, stems removes and torn into smaller pieces
juice of 1 lemon
salt and pepper, to taste
olive oil for cooking

 
Make the Meatballs:
Combine all ingredients for meatballs and mix well until well incorporated.

Heat some olive oil in a large skillet over medium-high heat. Roll mixture into small meatballs, size smaller than a ping-pong ball. Fry meatballs for 7-8 minutes, turning them throughout so they are golden-brown on all sides. Set aside on some paper towels to drain any excess oil.

Make the Soup:
Over medium-high heat, add some oil to a large soup pot. Once hot, add the onion, celery, carrot, and lemon peels. Saute for a few minutes, then add garlic, thyme, chicken broth, and fish sauce. Season with salt and pepper then bring to a boil.

Once boiling, add the dried tortellini. Continue cooking until tortellini is al-dente. Reduce heat to medium, add the meatballs, cover and cook for 3 to 4 minutes. Prepare the kale and add to the soup, stirring through, then cover and cook for another 5 minutes. Remove from heat then add the lemon juice. Stir and season with additional salt and pepper as needed. Let sit for 5 minutes off heat before serving.

Makes about 8 to 10 servings.

Sunday, March 13, 2016

light and filling.


Roasted Vegetable Hummus Plate: Just a quick dinner with roasted eggplant and butternut squash on light, creamy hummus. A dash of sumac and parsley then drizzled generously with olive oil. Add some sliced naan and a simple salad to the side and you have yourself a mighty tasty dinner indeed.

Wednesday, March 2, 2016

patty, cake, or burger?


I've been slightly pescatarian lately. I don't know if it's because of laziness or if it's because I'm trying to eat healthier. All I know is that I've been eating a lot of fish as of late and I don't know when it's going to stop.

Take these tuna burgers, for example. I could very well have baked or pan-fried some chicken to put on my salad, but canned tuna seemed way easier and more interesting to make. I liked that I could put veggies in my protein and that it was going to take me 10 minutes to make. See what I mean? Lazy or healthy?

When I made these patties (or is it cakes? or is it burgers??), I was originally going to make an actual burger like the title suggested, but I didn't really have any bread in the house. So instead, these "burgers" turned into patties that topped some spinach and arugula. I added some tomatoes for sweetness and slivers of red onion for bite. To finish this off, I made a thin, spicy ramoulade that doubled as a topping for the patties and a dressing for the salad.

Would I make these patties again? Maybe. When I made them, I knew that they were going to be slightly dry (which they were). I think if I added more breadcrumbs so that it had a slightly more cakey consistency, they wouldn't be so bad. Despite that, the flavors were actually quite tasty so I might play around with the recipe and see if I can improve the texture. Until then . . .

---- o o o o ----

Tuna Burgers
(slightly adapted from Spright)

2 (5.oz) cans chunk light tuna, drained
2 eggs, beaten
2/3 large carrot, grated
1/2 green onion, sliced
1 tbsp nutritional yeast or parmesan cheese
1 tbsp Italian seasoning
1 tbsp dried parsley
1 pinch cayenne powder
2 pinches of salt
2 pinches of pepper
4 tbsp olive oil
2 tbsp plain bread crumbs

 
Combine all ingredients except the olive oil in a medium bowl; mix with a fork or your hands until all ingredients are evenly distributed. Using your hands, take small handfuls of the mixture and form them into patties.

Pour the olive oil into a medium-sized pan and bring it to medium heat. Once the oil is hot, place the patties in the pan.

Cook each side of the patties for 4-5 minutes, turning them over carefully with a spatula or tongs. Place on a paper towel for a few minutes on each side to drain excess oil then serve.


Thursday, February 25, 2016

blackened, not burned.


Holy. Crap. I think that this may be the BEST fish sandwich that I've ever made. Talk about crazy delicious, this was a spicy, tangy, savory explosion of flavor in my mouth and I am so sad that it's all gone. You should really make this . . . like, RIGHT. NOW.

I came across this fish sandwich when I was looking to try out the blackened seasoning I made. I recently went to Safe Harbor Seafood Market and Restaurant down in Jacksonville and had their famously fantastic blackened shrimp nachos. Wow, were those nachos super tasty! I was going to do a food hack of the nachos, but unfortunately I didn't have the right ingredients to remake it.

What I did have was some ciabatta bread and a few frozen flounder fillets. Sounds like blackened fish sandwiches to me. :)


When I was looking for the perfect sandwich recipe, I wanted mainly one thing: no mayo in the slaw. This recipe was perfect. I liked that it was colorful and the red cabbage slaw was vinaigrette based. Also, I was able to utilize two of the seasonings I had in my cupboard; the blackened seasoning I just made and adobo seasoning.

Speaking of adobo seasoning, I had made mine (a mixture of these two recipes) before trying the McCormick's version. I did NOT like McCormick's version at all. I think it was the taste . . . it seemed off and not at all what I was expecting it to be. Whenever I have Mexican adobo sauce, it's usually more red than yellow and the homemade mix came closer to what I was used to. I had to throw the bottle of McCormick's adobo seasoning away. :/

On a happier note, the seasoning mixes worked well in this particular recipe. I've switched out the seasoning that the fish originally had with equal parts blackened seasoning. For the chipotle mayo, I subbed out the canned chipotles with dried ground ones and the adobo sauce for the seasoning. I don't usually have canned chipotles in adobo sauce in the pantry and I've found that this makes an acceptable substitute. Everything else pretty much stayed the same.

I'm telling you . . . these are the best fish sandwich EVAR.

---- o o o o ----
 

Blackened Fish Sandwich with Red Cabbage Slaw and Chipotle Mayo
(barely adapted from Daydream Kitchen)

For the Slaw:
1 small garlic clove, finely chopped
1/2 small red onion, finely chopped
1½ tbsp white balsamic vinegar
1 tbsp extra virgin olive oil
sea salt
freshly ground black pepper
1 cup finely shredded red (or purple) cabbage
¼ cup thinly sliced, 1-inch strips of green bell pepper (“matchstick” sized)
¼ cup coarsely chopped cilantro
1 scallion, thinly sliced (white and green parts)

For the Chipotle Mayo:
2½ tbsp light mayonnaise
1/4 tsp dried chipotle pepper flakes
1/2 tsp adobo seasoning

For the Sandwich:
2¼ tsp blackened seasoning
1 tsp olive oil
2 5-oz skinless fish fillets, about ⅓-inch thick (cod, salmon, flounder, etc . . .)
2 crusty sandwich rolls, halved and lightly toasted

 
Make the slaw:
Combine the garlic, shallots, and vinegar in a small bowl. Whisk in the olive oil and season with salt and pepper.

Combine the cabbage, bell pepper, cilantro, and scallion in a medium bowl. Add the dressing and toss well to combine. Taste for seasoning and add more salt and pepper, as needed. Cover and refrigerate 30 minutes to allow flavors to combine.

Make the mayo:
Combine the mayonnaise, chipotle pepper, and adobo sauce in a small bowl. Set aside. (Alternately, you can substitute sour cream or greek yogurt for a lighter dressing.)

Make the sandwich:
Rub the blackening seasoning all over the fish, coating both sides well and pressing to adhere. Heat a nonstick skillet over medium-high heat and add the olive oil. When the oil is hot, but not smoking, season the fillets with salt and add to the pan.

Sear until beginning to blacken on the bottom, about 3 minutes. (Reduce the heat to medium if the spices begin to burn.) Turn and sear the second side until blackened and the fish is just cooked through, about 2 minutes longer, depending on thickness.

To serve, spread the chipotle-mayo sauce on all 4 cut sides of the rolls and lay a filet on each bottom half. Mound the red cabbage slaw on top of the fish and cover with the top halves. Serve right away.

---- o o o o ----
 

Blackened Seasoning
(from Mom-Makes . . .)

2 1/4 tsp sweet paprika
2 1/4 tsp smoked paprika
1 tbsp garlic powder
1 tbsp onion powder
1 tbsp dried thyme
1 tsp ground black pepper
1 tsp dried basil
1 tsp dried oregano
1/2 to 1 tsp cayenne pepper

 
Combine the paprika, garlic powder, onion powder, thyme, black pepper, cayenne pepper, basil, and oregano in a food processor or spice grinder and pulse until finely ground and evenly mixed. Alternately, sift ingredients into a bowl and whisk until well combined. Store in an airtight container in a cool, dry place. Keeps up to 6 months.

---- o o o o ----
 

Adobo Seasoning
(adapted from Food. and Lemon Chiffon Cake)

1 tbsp lemon pepper seasoning
1 tbsp garlic powder
1 tbsp onion powder
1 tbsp dried oregano
1 tbsp parsley flakes
1 tbsp achiote powder
1 1/4 tbsp kosher salt
1 1/2 tsp ground cumin
1 tsp sweet paprika
1/2 tsp smoked paprika
1/2 tsp ancho chile powder
1/4 tsp turmeric powder

 
Combine all ingredients in a food processor or spice grinder and pulse until finely ground and evenly mixed. Alternately, sift ingredients into a bowl and whisk until well combined. Store in an airtight container in a cool, dry place. Keeps up to 6 months.

Tuesday, January 5, 2016

taste it and make it: bulgogi sandwich!


When the hubby and I were still in Guam, there were a few eateries we found that got into our usual meal rotation. Our top three were definitely Katre's Bistro, Pika's Cafe, and surprisingly, Dr. Kabob (a Greek fast food joint). Pika's Cafe, though, would probably be the best "farm-to-table" restaurant the island has. Their moto and menu revolved around the phrase, "Buy local, eat local, support local!".

With that, Pika's Cafe also had a revolving seasonal special and a bunch of unique items on their standard menu. The hubby's favorite was definitely their Korean BBQ Sandwich. In the past month, I've heard the hubby lament several times on the loss of acess to that particular sandwich. Every time we passed the Asian isle on the grocery store, he would comment with "I miss Pika's" . . . which meant the sandwich, of course, lol.

I figured I'd give him a surprise!

Enter, my version of the Korean BBQ Sandwich! Since he was missing the sandwich so much, I thought that I would try and replicate the sandwich as close as I could. I knew that it had bulgogi marinated beef, with kimchi-style pickled vegetables, and cucumbers. It also had a chili mayonnaise.

Knowing was half the battle . . . It's the execution that was the problem. In mine, I decided to sub the beef with chicken. It was lighter than beef (I wanted to get away from heavy foods for the time being) and I thought it would be easier to marinate. Also, I didn't have any beef in the fridge anyway which was another big factor, lol.


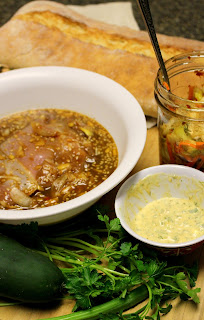
For the marinade, I decided to go with this recipe but adapted it slightly to include minced apples and sliced onions. From what I read on the web, one of the traditional ingredients to add was either Korean pears or kiwi. Well, since I had neither, I subbed with Golden Delicious apples instead (since that was what I had in the pantry). After making the chicken, I ended up with quite a bit of marinade left. I decided to cook it down and made it into a sauce for the chicken afterwards.

The kimchi recipe was something that I was pleasantly surprised to find. I thought that I would have to put my ingenuity to the test, but apparently someone had already used theirs. I love that this uses regular cabbage and ingredients I already had on hand ("emergency kimchi" indeed!). In traditional kimchi, a coarse ground red pepper called gochugaru is commonly used. However, I've also seen a few recipes call for a fermented chili paste called gochujang to be used instead of the gochugaru. Well, I decided to go with the flavor notes of the gochujang since this would be quickly pickled to be used the next day. That way, I would have the taste of a long fermented kimchi without actually waiting. :)

During the taste testing, I found that this kimchi had a lot of heat to it. So, I nixed the chili mayo that I was originally going to make. Instead, I decided to use some of the leftover chimichurri, mixed with some ketchup and mayo, to make an aioli out of that (secret sauce, baby!). It has a lot of acidity so I thought it would help imitate the "pickled" part of the sandwich. With the ciabatta, kimchi, chicken bulgogi, aioli, and cucumbers all ready to go, my sandwich was ready to be assembled!

This turned out better than I hoped! It had the same savory, sweet, and spicy flavors the Pika's sandwich had. The only drawback was that the sandwich was messy to eat. The chicken made the whole thing a little bulky and the "take-and-bake" ciabatta bread I bought was a tad bit too chewy. The sauce made from the marinade also made this messy, but I think it wouldn't be the same without it. And the kimchi? Everywhere.

Next time, to reduce the messy factor, I'll get a softer ciabatta and cut the bread so it'll envelope the fillings more. Also, I'll toss the chicken in the sauce first and shake off any excess. That way, I'll still get some of the sauce on the chicken. But man, this was one of my favorite experiments!! Oh, by the way, the hubby LOVED the sandwich. Although it wasn't Pika's Cafe's Korean BBQ Sandwich, he thought it was a damn good substitute. :D Now, back to the drawing board . . .

---- o o o o ----
 

Korean Chicken Bulgogi
(slightly adapted from Meg's Everyday Indulgence)

2 to 3 pcs boneless chicken thighs

For the Marinade:
1/2 a Korean pear, apple, or kiwi, minced
1/2 a small onion, thinly sliced
3 tbsp soy sauce
1 tbsp lemon juice
1 tbsp brown sugar
1 tbsp honey
1 tbsp rice wine, mirin, or cream sherry
1 tbsp sweet chili sauce
1 tbsp sesame oil
1 tbsp minced garlic
1 tbsp white vinegar
1 tsp grated ginger
1 tsp toasted sesame seeds
1/4 tsp black pepper

 
Mix the marinade ingredients in a bowl until the sugar has dissolved. Add chicken and toss well to coat. Cover and marinate for a minimum of 30 minutes up to overnight in the fridge.

To cook, preheat a skillet over medium high heat. Add the chicken, reserving the marinade. Cook until chicken is cooked through and slightly caramelized, taking care not to burn. If needed, add the reserved marinade by tablespoon when the pan gets dry. Garnish with sliced scallions and toasted sesame seeds. Serve with a side of kimchee.

---- o o o o ----
 

Quick Emergency Kimchi
(slightly adapted from Maangchi)

2 lbs green cabbage, cut into thin 2-inch strips
1/2 a small onion, thinly sliced
1 cup cold water
1/4 cup kosher salt
1/3 cup hot pepper flakes
1/4 cup fish sauce
1/4 cup minced garlic
1/3 cup (3 to 4 stalks) chopped green onion
1/4 cup julienned carrots
1 tbsp sugar
1 tbsp soy sauce
1 tsp ginger

 
Place cabbage in a large bowl and add cold water and kosher salt. Mix well with hands to properly salt cabbage. Set aside for 10 minutes. Make a paste with the remaining ingredients.

After the cabbage has soaked, wash and rinse the salted cabbage in cold water a couple of times then drain well. Return the cabbage to the bowl and mix the paste into the cabbage thoroughly.

Put the finished kimchi into a container, jar, or plastic bag. Press the top of the kimchi down with your hands to protect from exposure to too much air.

Refrigerate for at least 30 minutes before serving or eat right away like a salad. Alternately, keep at room temperature a few days to ferment if desired.

Sunday, November 15, 2015

something fishy goin' on...


I've referenced Boudin Bakery a lot. It's no wonder that since working there, I've been much more proficient in making sandwiches. Hell, my family turned into sandwich freaks for a while when I was still employed at Boudin!

Now, sandwiches are comfort food for me and the hubby. It's fast, it's healthy, and it's always good. In fact, when my hubby was sick back when we were dating, I would make him a lot of tuna salad based on Boudin's recipe. It's been evolving since then and I've finally got it down to the way I like it.

It starts off with the basics of tuna salad: tuna, mayo, onion, and celery. Then I upped the parsley, added a little bit of this and that to round out the taste, then add a bunch of my favorite sandwich salad seasoning: dill weed! Call me a Trekkie, but I got the idea when I watched the movie, Star Trek: Generations (the part when James T. Kirk was making scrambled eggs for his wife).

Turns out, adding dill was an excellent idea! It adds a little somethin'-somethin' to the tuna to make it extra special. Add some shredded romaine lettuce and a couple slices of juicy tomatoes and we're in business! If sandwiches aren't your thing, you can always dallop a scoop on salad or add some pasta for an awesome picnic pasta salad. Want something hot? I've found that these make excellent tuna melts. The possibilities with tuna salad are endless!

---- o o o o ----
 

Herbed Tuna Salad
(Makes about 2 cups)

3 cans chunk light tuna, drained well
1 cup chopped red onion
1 cup chopped celery
1/4 cup minced flat-leaf parsley
1/2 tbsp lemon juice
1 tbsp dried dill
1 tsp Tapatio hot sauce
1 tsp sweet relish
1 tsp yellow mustard
1/4 tsp paprika
1/2 tsp kosher salt
1/2 tsp fresh ground black pepper
3/4 to 1 cup light mayonnaise

 
Combine all ingredients except mayo and mix well. Using 1/4 cup at a time, add mayonnaise until preferred consistency. Adjust seasoning with additional salt and pepper as needed. Refrigerate and let marinate for at least 30 minutes before serving.