Wednesday, November 6, 2013

all mine, occasionally.


I have to say that one of my favorite past times is looking up things to cook. it probably has something to do with too many cooking shows, gordon ramsey, and wanting to be as good of a cook as my mom. I'd go through a lot of recipes both online and in books to see what kind of deliciousness i can make. once in a while, though, it's nice to be able to come up with something on my own. :) this is one of two such recipes that i can say i made without a guideline and can be truly proud of. it's rich, tasty, and super flavorful...exactly how i had envisioned in my head.

the chicken roasts on top of the vegetables, flavoring it and creating a broth that the veggies stew in. meanwhile, the veggies keeps the chicken nice and moist, lending flavor to the broth as well. i decided to broil the chicken in the last five minutes of cooking to give it a some color. the end result? a rustic-style dish that goes well with crusty bread or some creamy mashed potatoes. here, i had it with a couple slices of herbed soda bread i made a few days before. it was the perfect medium to soak up all that juicy goodness!


Garlic-Herb Chicken Bake
(makes 3 to 4 servings)

4-6 skinless, boneless chicken thighs depending on size
4 tbsp butter
2 tsp garlic paste (or 3-4 garlic cloves, minced)
1 medium tomato, roughly diced
1/2 medium onion, sliced
1 package frozen vegetables, italian or california style
1/8 cup or so extra virgin olive oil
1 tsp dried thyme, marjoram, or rosemary (use one or a combination of)
1 tsp paprika, halfed
1/8 tsp cayenne pepper
kosher salt
coarse ground pepper


Preheat oven to 350 degrees. Melt butter with the garlic in a microwave-safe bowl and heat until just melted. Set aside. Prepare the tomatoes and onions and combine with the frozen vegetables in a large bowl. Add the olive oil, herbs (in this version, i used half thyme and half marjoram), half the paprika, cayenne pepper, and about 3/4 of the garlic/butter. Season with salt and pepper and stir to combine. Take a baking pan and evenly line the bottom with the vegetable mixture.


In the same bowl, take the chicken and pierce a few times with a fork. Season with salt, pepper, the rest of the paprika, and the remaining garlic/butter mixture. Massage into the meat for a couple of minutes then top the vegetables with the seasoned chicken.

Place the pan in the center rack and bake for approximately 50 minutes, basting occasionally. In the last five minutes of cooking, turn the oven up and broil the chicken until it gets a nice color. Take out of the oven and let rest 10 minutes. Serve hot with a side of crusty bread or some creamy mashed potatoes.

Saturday, October 26, 2013

small ears.


oreccheitte pasta has always been a favorite macaroni of mine because of the shape. those small little ears gives just the right amount of pasta in each bite and, bonus? you can pierce it with a fork or scoop it up with a spoon! i experimented with making a salad with some ingredients i had on hand and ended up with a great tangy recipe that i adore. when cooking the pasta, make sure to use plenty of olive oil or butter so that the orecchiette doesn't stick together when cooking (urgh...mine did, lol).


Italian Orecchiette Salad with Tomato, Basil, and Arugula.
(makes 6 to 8 servings)

for dressing:
3 tbsp extra virgin olive oil
3 tbsp italian dressing (used wishbone)
1 tbsp lime juice (only had the bottled kind at the time, so used that)
1 1/2 tsp sugar
1 tsp ground pepper (used mccormick's peppercorn medley)
1 tsp dried parsley (or you can use fresh italian parsley, about 2-3 sprigs)

4 cups cooked orecchiette pasta
1 clamshell grape or cherry tomatoes, halved
1/4 cup red onion, chopped or sliced

1 small sprig fresh basil, slivered
2 large handfuls of arugula
1 cup shaved parmesan

Combine the ingredients for the dressing, whisking together well. Add the orecchiette, tomatoes, and onion to the dressing and season to taste by using the listed seasonings. Refrigerate overnight (or at least an hour) for the flavors to develop. Right before serving, gently fold in arugula, basil, and shaved parmesan. Best served chilled.

abundant avocados.


ah, avocados. i was on an avocado kick and recently went to my nearest grocery to get some. i was super lucky that day...they were on sale, two for a dollar! yaaay! needless to say, i went a little crazy and bought about ten avocados. ten! after about a couple of days, i realized that i was eating less than i thought i would be. luckily for me, i have roommates that like avocados and helped me put away some. i had about four avocados left and i was wondering if i could do something else creative with it besides putting it as a topper on something. enter sweet avocado quick bread!


this bread bakes up beautifully. a nice golden crust with a nice moist olive green inside. you can definitely taste the avocado but it was delicious with the hint of cinnamon and vanilla. next time, when i do have some orange zest, i'll definitely add it in for that "fresh flavor". :)


Sweet Avocado Quick Bread
(from CC Recipe)

2 cups all-purpose flour
3/4 cup sugar
1 1/2 tsp baking powder
1/2 tsp baking soda
1/2 tsp salt
1/2 tsp cinnamon
1/2 tsp all-spice (didn't have any, so skipped this and about doubled the cinnamon)
1 avocado, mashed (I use Haas avocados) (used 2 large avocados)
1 large egg
1/2 cup buttermilk
1 tbsp orange zest (didn't have any so i subbed vanilla paste, about 1 1/2 tsp)

1. Preheat the oven to 375F. Generously grease a 9 x 5-inch loaf pan. (didn't do this...lined the pan with parchment paper for easy clean-up instead. >:D)

2. Combine the flour, sugar, baking powder, baking soda, salt, cinnamon and all-spice in a large mixing bowl. Whisk to blend thoroughly.

3. Remove the avocado from the skin and remove pit, place avocado in a separate bowl, and mash the avocado. Beat together the egg and avocado. Stir in the buttermilk and orange zest.

4. Add to the dry ingredients and blend well. Pour into the prepared pan and bake for 50 minutes to 1 hour or until a wooden pick inserted in the center comes out clean.

Thursday, October 24, 2013

recipes in pictures: fusing food


my all-time favorite kind of ethnic cuisine would probably be indian food. it's rich...it's spicy...it's so flavorful and the use of spices are amazing! but even though i love the stuff...i can't seem to make a decent curry. it's always a little off or it doesn't turn out quite how i wanted it to. i decided to try my hand at malai kofta using parts of this, this, and this recipe and also tried my hand at making some naan.


let me tell you...it's still a bit of a struggle for me. the naans came out like pancakes (too thick on the width) and the malai kofta were off a little bit (needed more gravy and some kind of seasoning i can't taste). however, i was happy that i got to experiment with using felafels as the dumplings instead of making my own (thank you, vine ripe market, for your excellent felafel bin!). next time, i'll see if i can do a chicken tikka masala. :)

Sunday, October 20, 2013

dinner guests.


today was a quiet day. laundry in the morning and had one of our friends for dinner. we hadn't seen them in a long time and we knew that they liked a good tasty meal. so, my sister and i decided to make the same poultry recipe from before but used chicken quarters instead of dealing with butterfling a few cornish hens.

we changed up the sides to brussles sprouts and tried a new recipe for mashed potatoes. the mashed potatoes came out surprisingly good. they went well with the chicken and the brussels sprouts and were slightly savoury and tangy from the garlic, green onion, and lemon--they ended up bightening the whole meal. :) it's been decided: they're soooo going to be a repeat in the future!


Mashed Potatoes with Lemon, Garlic and Chives
(bareley adapted from Creative Culinary)

1/4 cup buttermilk (i didn't have any so i just used fat free milk we had in the fridge)
6 tablespoons butter (used a little less, maybe 5 tsp max?)
3 garlic cloves, minced
2 teaspoons grated lemon peel (reserved some for garnish)
juice of a little less than half a lemon
1/2 cup chopped green onion (or fresh chives) (reserved some for garnish)
2 pounds red potatoes, cut in half (do not peel) (used mixed baby potatoes)

1. Melt 3 tablespoons butter in heavy small skillet over medium heat. Add garlic and sauté 1-2 minutes; do not brown. Mix in lemon peel, then green onion or chives. Set aside. (added the lemon juice around here and let it cook for a little bit--try not to let it cook too long, you want the onions to still be slightly green when they're done)

2. Cook potatoes in large pot of boiling salted water until tender, about 20 minutes. Drain. Return potatoes to pot and mash roughly; these are not meant to be the consistency of regular mashed potatoes. Add onion mixture, buttermilk and remaining 3 tablespoons butter and mash together. Season with salt and pepper.

3. Garnish with fresh chives or green onion. (decided to just mix everything together with the reserved chives and lemon zest.)

makes 4-6 servings.

Friday, October 18, 2013

tasting the garden.

made hummus today! after a long hiatus of not making it for a while, got inspired by this recipe but decided to add a few extra things in it for an even more garden-y flavor. i ended up with a nice, light hummus with the taste i was definitely aiming for! be forewarned tho...the measurements for the veggies are vague for a reason. more room to customize!


Vegetable Garden Hummus

2 cans garbanzo beans, rinsed with half can of the liquid reserved
1 can cannellini beans, rinsed
1/4 cup extra virgin olive oil
2 garlic cloves
handful of chopped red onion
handful of baby carrots
handful of chopped yellow bell pepper
handful of italian parsley
2-3 tbsp lime juice
2-3 tbsp tahini
2 tsp sweet paprika
1/2 tsp cellery salt
a couple dashes of onion powder
a couple dashes of garlic powder
water
salt and pepper to taste
toasted pine nuts for garnish

Combine everything in a blender/food processor and adjust consistency with water. season with salt and pepper to taste. garnish with a drizzle of extra virgin olive oil, sprinkle of sweet paprika, toasted pine nuts, and a little bit of chopped italian parsley.

makes a little over 2 cups.

Saturday, October 12, 2013

going south in the morning.

chilaquiles was one of the first things that i learned when i was in home economics waaaay back in grade school. i remember my teacher, mrs. morehead (yeas...she got a lot of slack for her last name) was this quiet little lady with a soft voice and with a patience of a nun. i went to public school so i found that that there were a lot of slackers in that class that just wanted to give her such a hard time. interestingly enough, though...when it came to making food, they were all ears. probably because they not only get to cook whatever it is that they made...they got to eat it too. :)

back to chilaquiles...they were definitely not something that i've ever heard of when i was younger. fried corn tortillas, tomato sauce, and then american cheese was how i thought they were usually made of. it wasn't until i tasted authentic chilaquiles that the home ec version didn't even come close to what it was supposed to be like! nonetheless, sometimes when i feel nostalgic and think of those home ec days, i think of mrs. morehead and the americanized mexican dish she all made us cook and eat.


my sister enjoying the fruits of our labor!

this dish isn't authentic by any means. it has some delicious leftover carnitas and fresh made corn tortialls from our local mexican market as well as some fresh made guacamole from the same place. not having any salsa in the house, we opted for some organic tomato sauce as a substitute, as well as some plain yogurt and chopped romaine as a topping. it was a very hearty, crispy, savory and tasty morning treat. :D


Egg Carnitas Chilaquiles
(makes about 3 to 4 servings)

2-3 cups corn tortillas, cut to about 1 inch wide
oil for frying
1 medium onion, diced
1 1/2 to 2 cups pork carnitas, roughly shredded
1 can organic tomato sauce
1/4 - 1/3 cup red chile salsa, plus more for topping
1 large egg, beaten
1/4 cup shredded spicy cheese mix or mexican cheese mix, plus more for topping
salt and pepper to taste
small head of romaine, cut into strips
guacamole
pico de gailo
plain yogurt

Heat oil in pan over medium-high heat until hot. Take the cut tortillas and carefully drop them into the oil (work in small batches if you have a small pan/pot). Fry them until golden brown and the tortillas are nice and crispy/crunchy. Drain on a paper towel and set aside.

Fry the onions in a little bit of oil and cook them until slightly browned. Add the carnitas and cook for an additional few minutes. Add the beaten egg and let sit for a couple of minutes. You want to make a kind of a scramble without over-mixing so there will be some nice pieces of egg later on. Now stir and cook the mixture for a little bit until the egg is mostly cooked then add the crispy corn tortillas.

Once the mixture is well mixed, add the can of tomato sauce making sure to coat all the tortilla chips. let cook for several minutes then add the red chile salsa, stirring to incorporate. salt and pepper to taste then stir the cheese in slightly. Remove from heat immediately as you want the tortillas in the chilaquiles to still be a little crunchy when you take a bite. serve topped with additional red chile salsa, cheese, lettuce, guacamole, pico de gallo and yogurt.

Wednesday, October 9, 2013

roasting for the rain.

today was a cold day. the rain fell in hard little drops and the crispness of the air signaled the start of fall in our normally temperate city. what better way to welcome the season than a nice roasted game hen? :)

this recipe for the cornish game hen was really killer. savoury and tasty...the kind that you just want to keep on eating until you couldn't eat anymore. the flavor of the garlic and soy suace with a light lemon finish really stayed in your mouth. we ended up doubling the recipe as the hens we got were on the smaller side.

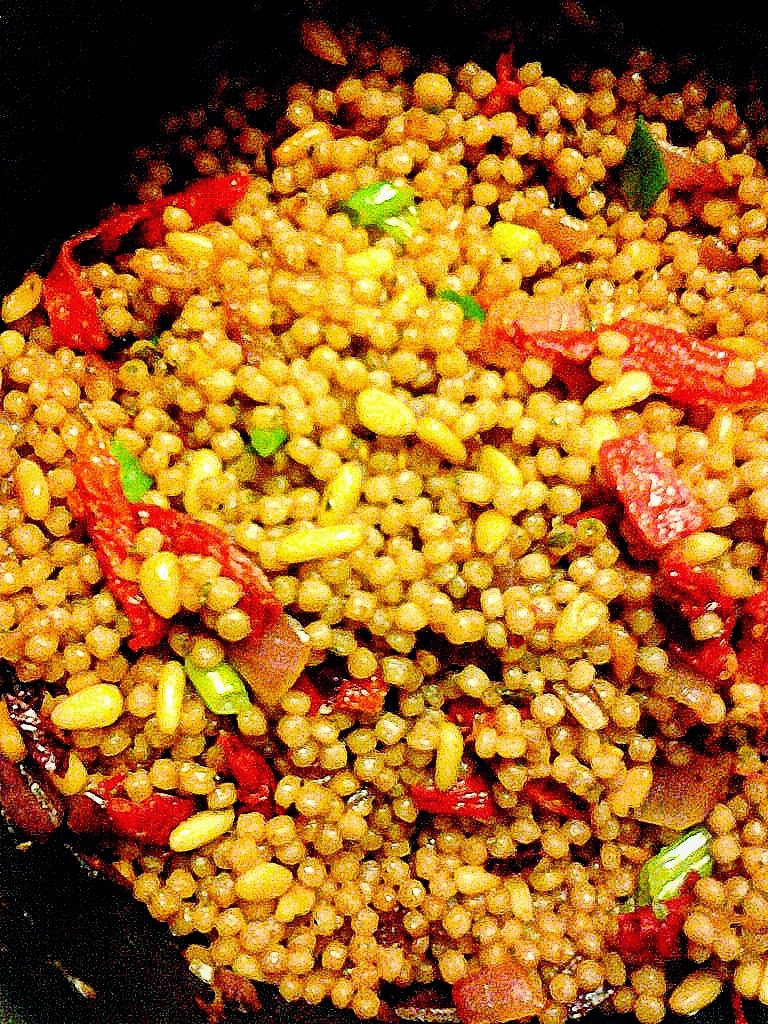
my sister and i paired it with tarragon glazed carrots and a coucous to balance everything out. the sides we chose were a great accompaniment to the hens and everything just worked together to create a perfect fall meal. next time i do the couscous though, i'd make it a tad more tomato-y and add less butter. we also adjusted the recipes to serve two people.

Cornish Game Hens with Lemon and Garlic
(from What’s Cooking America)

1 Cornish Game Hen*
Coarse sea salt and freshly-ground black pepper
1/4 cup low-sodium soy sauce
3 to 4 minced garlic cloves
Juice from 1 to 2 lemons (to taste) (we only had bottled, so guestimated)
2 tablespoons butter

* Have your meat cutter cut one (1) Cornish game hen in half. Remove inside bag from each half prior to preparing.

Place non-stick aluminum foil on baking sheet. Salt and pepper both sides of the Cornish game hen.

In a microwave-safe bowl, combine soy sauce, garlic, lemon juice, and butter. Heat in microwave until butter has melted and you can smell the garlic. Carefully remove from microwave.

Baste both hen halves, on each side, with the prepared marinade and place on the prepared baking sheet. NOTE: The hens can now go back into the refrigerator until cooking time. Remove 1 hour before cooking to allow hens to come to room temperature.

Heat the broiler of your oven and move oven rack up to the second notch below the broiler element. Broil hens on one side until you see the marinade start to bubble and the skin starting to brown; baste again, turns hens over, baste, and broil until starting to brown. Using oven mitts, remove Cornish game hens from the oven.

Turn the oven to 375 degrees F. Move oven rack down to roasting position.

Place the partially cooked Cornish game hens back in the oven (cut side down), and baste again. Roast until the hens, are done, or until a thermometer registers an internal temperature of 165 degrees F. (juices will run clear when cut with the tip of a knife). Baste frequently with accumulating juices.

Remove from oven and baste again with the remaining juices that have browned nicely on the foil. Cover cooked Cornish game hens loosely with a piece of aluminum foil for about 10 minutes. Baste again on both sides, and place on individual serving plates.


Herb and Tomato Couscous
(from Honest Fare)

About 10-12 sun dried or roasted tomatoes (used sun-dried tomatoes in olive oil)
Olive oil
Handful of fresh sage and oregano (used dried and eyeballed it, maybe 2 tsp each?)
Salt
Black Pepper
1 small clove garlic (trippled this and used roasted garlic instead)
1/4 red onion (doubled this cuz we love onions :D)
2 shallots (i subbed chopped scallions and added it in the end)
1 1/2 cups dry couscous (we used boxed whole wheat couscous)
1/4 cup pine nuts (feta crumbles as sub.)

1. Dice up herbs, tomatoes, shallots, red onion and garlic (set a small amount of fresh herbs aside for later). Saute it all on medium heat in about 4 tablespoons of olive oil until onions are tender. Add a teaspoon of salt and some cracked black pepper. Keep partially covered for about half the time so all the juice doesn’t evaporate.

2. Prepare couscous: you’ll need 1 ½ cup dry couscous per 2 cups of water. When water boils, add 1 tablespoon of olive oil, ½ a teaspoon of salt and the grain. Remove pot from burner right away. Keep covered for 5 minutes. Fluff when fully absorbed. If you use a box, just follow those directions. (followed box directions)

3. Toast pine nuts: cover the bottom of a pan evenly with pine nuts (no oil is required). Cook on medium low heat (no higher!) and keep tossing them around until they’re browned on both sides. Don’t take your eyes off them too long or they’ll burn…and that sucks.

4. Add herb and tomato mix to the couscous. Crack a little extra pepper and hit it with another dash of salt and/or olive oil if you like. Toss REALLY well to remove all clumps. Top with pine nuts or feta cheese and the fresh herbs you set aside in the beginning. Toss again and serve. (next time, i would probably put the herbs and use the oil from the tomatoes together in the pot of couscous while it's cooking. this would pobably make the dish a little bit more flavorful.)


Tarragon Glazed Carrots
(from A Teaspoon of Happiness)

8 carrots, sliced
2 tablespoons butter or margarine
1 clove garlic, minced
1 tablespoon finely chopped fresh tarragon (used dried, about 1-2 tsp)
1/2 teaspoon salt
1/4 teaspoon pepper

1. In a large saucepan or skillet, cover carrots with water and bring to boil - keep pot covered.

2. Reduce heat and continue simmering for about 10 - 15 more minutes or until carrots are tender.

3. Drain water from the pot.

4. Stir in the remaining ingredients and allow to cook for 2 more minutes or until butter is melted.

Thursday, September 12, 2013

portable granola.

I love granola. seriously, I do. I like them plain, with nuts, with fruit, on yogurt, in bread...you name it, I like 'em with, it, on it, and made from it. I remember a few years back, I went out on a granola binge and for days on end granola would be the only thing that people would see me eating. I had six or seven boxes at any given time and they would all be gone in a couple of weeks. that's not even including the bars i kept everywhere. yeah..it was bad.

but for all that granola loving that I did, I never once made my own granola or granola bar. which is weird, considering it's relatively easy to make. so I decided to make some bars. I decided on this recipe since the pictures looked so damn good. I love them chewy granolas! I made some substitutions based on what i had on hand and the resulting granola bars weren't as chewy as i'd hoped. but! they were good none the less and came out having a strong peanut-butter taste. next time, i'm gonna follow the recipe and see what they're supposed to taste like. :) here's the original recipe:

Thick and Chewy Granola Breakfast Bars
(from Smells Like Home)

1 2/3 cups oats (quick-cooking or old fashioned)
1/2 to 3/4 cup granulated sugar (use more for a sweetness akin to most purchased bars; use less for a mildly sweet bar; omit altogether if your add-ins are super sweet)
1/3 cup oat flour (or 1/3 cup oats, processed till finely ground in a food processor or blender)
2 tbsp finely ground flax seed (optional)
1/2 tsp salt
1/2 tsp ground cinnamon
2 to 3 cups dried fruits, nuts, chocolate, coconut, seeds, etc. (total of 10 to 15 ounces)
1/3 cup peanut butter or another nut butter (optional but recommended)
1 tsp vanilla extract
6 tbsp melted butter
1/4 cup honey or maple syrup
2 tablespoons corn syrup (light or Lyle’s Golden)

1. Preheat oven to 350 degrees F. Line the bottom of an 8-inch square pan with parchment paper leaving the ends of the paper to hang up and over the two opposite sides of the pan. Lightly grease the paper and the exposed sides of the pan.

2. In a large bowl, stir the oats, sugar (if using), oat flour, flax, salt, cinnamon, and your dry add-ins together. In a separate medium bowl, whisk the peanut butter, vanilla, butter, honey/maple syrup, and corn syrup together until will combined and smooth. Immediately pour the wet mixture over the dry ingredients and with a rubber spatula, mix everything together until the oats are well-coated and sort of crumbly.

3. Transfer the granola mixture to the pan, pressing it down firmly and evenly into the pan. Make sure the granola is tucked into the corners and sits tightly up against the sides of the pan – this will help when cutting them. Bake for 30 to 40 minutes, until the top is nicely browned. Cool the pan on a wire rack for 20 minutes then transfer the uncut bars on the parchment paper from the pan to the rack to cool completely. Once they’ve cooled, transfer them to the fridge to set up well before cutting. Cut into 2-inch square pieces.

EDIT: found another good recipe that's somewhat similar to this one but a little less peanut buttery. tried this recipe and it was killer! gotta make more...!

Tuesday, September 10, 2013

moroccan heat.


in the past few weeks, my sister has been moving in with me and the best friend. and just like our previous sixteen years of life together, we were once again sharing a room. it's crazy how much one person accumulates things that make up their surroundings. a candle dish here, a couple chairs there...pretty soon we realized that with already two people's worth of stuff in the apartment, her things was *not* going to fit.

the solution?

well, we had to get rid of a lot of things. it was a very hard lesson of letting go and deciding which was garbage and which ones were definite keepers. and coincidentally, this exercise of "letting go" was also an existential metaphor for dealing with her recent break-up. and with that meant time in the kitchen to push back some memories and make some new ones that were just a tad less painful.

my sister can sometimes be very delicate when it comes to matters of the heart. but food, especially ethnic food, could always bring up her spirits when she's in a slump. since we had an excess of shrimp from both of our houses combined, we scoured the internet for something "exotic" to make that didn't stray from our existing pantry items. we found two winners...a recipe for shrimp and something to make with barley. the result? sweet and spicy moroccan shrimp with savoury spiced barley and brussels sprouts salad.

Tip: Make the salad first then shrimp to prevent the seafood from overcooking.


Sweet and Spicy Moroccan Shrimp
(from A Teaspoon of Happiness)

1 tbsp all-purpose flour
2 tsp paprika
1 tsp salt
1 tsp garlic powder
1 tsp ground cumin
1/2 tsp chili powder
1/2 tsp brown sugar
1/2 tsp ground coriander
1/4 tsp ground ginger
1/4 tsp ground tumeric
1/4 tsp cinnamon
1/8 - 1/4 tsp cayenne pepper
1/8 tsp black pepper
1/8 tsp ground cardamom (optional)
1 1/2 lbs of shrimp, peeled and deveined
2 tbsp oil

1. Mix seasonings and flour together in a small bowl.

2. Toss the mixture with the shrimp until evenly coated. (i added a little bit more olive oil here to thin out the paste the spices made with the shrimp)

3. Heat the olive oil in a large skillet over medium-high heat.

4. Add the shrimp to the pan and fry until thoroughly cooked - turning occasionally (shrimp should be completely pink).


Savoury Spiced Barley and Brussels Sprouts Salad
(adapted from MiNDFOOD)

1/2 tsp ground cumin
1/2 tsp ground coriander
1 tsp sweet paprika
1/4 tsp garlic powder
1/8 tsp ground cinnamon
pinch saffron threads
1/4 tsp dried chilli flakes
1/4 - 1/2 tsp kosher salt
1/8 tsp pepper

1 1/2 cups barley
3 cups chicken stock

1 lbs Brussels sprouts, halved

2 tbsp olive oil
1 red onion, thickly sliced
1/2 cup oil cured olives

1/4 cup parsley leaves, chopped
2 spring onions, sliced

Combine spices and set aside. Reserve 1/2 cup of stock to the side then cook barley according to package directions using the rest of chicken stock. Meanwhile, in a separate pot, steam Brussels sprouts in the reserved stock in medium heat until the pot is almost dry. Add the olive oil and onion and cook until the onion is slightly translucent. Add the spice mix and the olives and sauté until fragrant. Add the cooked barley and cook additional 3-5 minutes. Remove from heat and add the parsley and spring onions, tossing to mix. Serve warm or hot topped with the sweet and spicy morocco shrimp and a small drizzle of olive oil.