Showing posts with label thyme. Show all posts

Tuesday, December 13, 2016

for cozy winter days...


So, after a little bit of hiatus, I'm back!

Since it's been a while, I figured that I'd post with something warm and cozy for the winter months . . . a hearty turkey meatball soup! I found this recipe off Pinterest while I was looking for something to do with kale. Kale is one of those random ingredients that I occasionally buy but never really know what to do with. That's when looking for recipes come in handy. ^_^;

For the soup, I decided to add my own twist to it by including some dried pasta. Again, I wanted a really hearty soup and this was going to be used for more of a lunch/dinner type of entree. I also changed the taste profile...the cumin and the star anise seemed really weird to me so I omitted them in my soup.

All in all, the ending result was nice...savory and lemony, hearty and filling like I wanted it. Add a couple slices of toasted and buttered sourdough and his was the perfect good eats for a cold day. This does make a big pot of soup, so be prepared to have leftover for a couple of days! Enjoy!

---- o o o o ----

Lemony-Garlic Turkey Meatball Soup with Pasta and Kale
(adapted from The Holisitc Ingredient)

For the Meatballs:
1 lbs. ground turkey
2 tbsp bread crumbs
1/2 cup finely chopped leeks, white part only
handful fresh Italian parsley, finely chopped
1 tbsp dried mint leaves, crumbled
1 tbsp fresh thyme leaves
1 tsp bottled minced garlic
zest of 1 lemon
1/2 tsp salt
1/2 tsp pepper
1 tsp olive oil
additional oil for cooking

For the Soup:
1 medium onion, diced
3 ribs celery, diced
1 large carrot, diced
5 peels of lemon
1 tbsp minced bottled garlic
1 tbsp fresh thyme leaves
12 cups (3 quarts) low sodium chicken broth
2 tsp fish sauce
1 (6.5oz) pkg dry cheese tortellini pasta
10-12 kale leaves, stems removes and torn into smaller pieces
juice of 1 lemon
salt and pepper, to taste
olive oil for cooking

 
Make the Meatballs:
Combine all ingredients for meatballs and mix well until well incorporated.

Heat some olive oil in a large skillet over medium-high heat. Roll mixture into small meatballs, size smaller than a ping-pong ball. Fry meatballs for 7-8 minutes, turning them throughout so they are golden-brown on all sides. Set aside on some paper towels to drain any excess oil.

Make the Soup:
Over medium-high heat, add some oil to a large soup pot. Once hot, add the onion, celery, carrot, and lemon peels. Saute for a few minutes, then add garlic, thyme, chicken broth, and fish sauce. Season with salt and pepper then bring to a boil.

Once boiling, add the dried tortellini. Continue cooking until tortellini is al-dente. Reduce heat to medium, add the meatballs, cover and cook for 3 to 4 minutes. Prepare the kale and add to the soup, stirring through, then cover and cook for another 5 minutes. Remove from heat then add the lemon juice. Stir and season with additional salt and pepper as needed. Let sit for 5 minutes off heat before serving.

Makes about 8 to 10 servings.

Monday, April 18, 2016

tagine, without the pot.


I love buying kitchen gadgets . . . especially if it's something that I'll particularly find useful. Sometimes, I buy them because they're cute or pretty. My latest splurge was at World Market where I got myself a nice-sized tagine!

I've been itching to use it and finally found a couple of recipes that I wanted to try. So, I got everything that I needed and started to cook. Unfortunately, I never used the tagine. Turns out, before you use a tagine, the bottom portion needs to soak overnight or else it'll crack. Not only that, but apparently I also needed a "heat diffuser" so that it'll protect the clay pot from excess heat. Who knew that clay pots were so finicky??

Luckily for me, I had a heavy-bottomed pot to use as an alternative.

Despite not using the tagine, this dish actually turned out pretty well! I used this and this as guides and went from there. And since I didn't have some of the ingredients listed, I made do with what I did have in my fridge/pantry: Moroccan oil-cured olives, saffron water, giant golden raisins, and plain lemons.

For the side, I decided to make some roasted beets. It's a little weird since I've never come across any Moroccan dishes that uses beets as a side dish, but it was either use them or let them go bad. Thankfully, they paired surprisingly well with the lemony tagine. I also served this with some saffron rice since the hubby isn't too keen on couscous.

So, what's the verdict? Two thumbs up from the hubby! Yay!

---- o o o o ----

Moroccan Chicken Tagine
(adapted from Simply Recipes and My.Recipes)

For the Chicken:
3 to 4 pcs bone-in chicken thighs
3 tbsp Moroccan spice
2 tbsp honey
1 clove garlic, minced
1/4 cup extra virgin olive oil

For the Tagine:
1 large or 2 medium onion, chopped
1 to 2 cloves garlic, minced
3 to 4 carrots, chopped to 1-inch pieces
1/4 cup large golden raisins
1/4 cup pitted oil-cured olives
juice of 1 lemon
1/2 lemon rind, pulp removed and thinly sliced
1 tbsp saffron water (or a pinch of saffron)
1/2 cup low-sodium chicken broth
salt and pepper, to taste
water, as needed
chopped parsley, for garnish

 
Marinate the chicken:
Combine chicken, spice, honey, garlic, and olive oil in a ziplock bag. Massage the marinade into the chicken to make sure it's evenly coated then marinate overnight (or up to 2 days) before making the tagine.

Make the tagine:
On cooking day, heat a heavy-bottomed pan over medium heat. Add the chicken, skin-side down, along with marinade liquid. Cook the chicken until lightly browned then turn over and repeat with the other side. Once the chicken is lightly browned on both sides, add the remainder of the ingredients except for broth.

Cook mixture for about ten minutes. Add broth, scraping the bottom of the pan, then cover with a tight-fitting lid. Cook for another 15 to 20 minutes, or until chicken is cooked and tender. If the dish is too dry, add water as needed and cook for a further few minutes. Season with salt and pepper, as needed, then serve garnished with parsley.

Makes 4 servings.

---- o o o o ----

Honey Roasted Beets
(makes 4 servings)

5 small red beets, quartered
5 small golden beets, quartered
1/4 cup extra virgin olive oil
2 tbsp honey
1 tsp fresh thyme
salt and pepper, to taste
2 tbsp white balsamic vinegar, flavored or plain
2 tbsp chopped parsley

 
Preheat oven to 375F degrees.

Whisk together olive oil, honey, and thyme. Season with salt and pepper to taste. Toss into beets then evenly spread onto a foil-lined baking sheet.

Roast for 30 to 40 minutes until tender. Remove from oven then add vinegar and parsley. Toss to coat, then transfer to a serving bowl. Drizzle pan juices over beets then serve.

Thursday, February 4, 2016

pork, 'taters, and peas.


Just a quick-ish dinner today. Pork chops with apricot and sage sauce, some peas, and a potato gratin. The gratin probably took more time than the pork did as I had to reduce the recipe to about 1/4 of the serving. I saw the recipe from an episode of Cook's Country and decided I wanted to try and make it. No butter or cream? Yes, please! Fortunately, I found a recipe online for it and the rest is history. The pork chops were more an afterthought. After spending so much time on the potatoes, I just wanted to make something that I didn't have to think about. Luckily, the chops tasted great, lol.

---- o o o o ----
 

Pork Chops with Apricot-Sage Sauce
(slightly adapted from American Diabetes Association)

2 (4.oz) pork chops
1/4 cup finely chopped shallot or onion
1/2 cup fat-free, low-sodium chicken broth
2 large fresh sage leaves
2 tbsp all-fruit apricot spread
salt and pepper, to taste
olive oil

 
Season the pork on both sides with salt and pepper. In a large nonstick skillet, heat the oil over medium-high heat. Cook the pork for 6 to 8 minutes, or until just slightly pink in the center, turning once. Transfer to a plate. Cover with aluminum foil to keep warm.

Put the shallot in the skillet. Cook for 1 minute, stirring constantly.

Pour the broth into the skillet, stirring to dislodge any browned bits. Let boil for about 5 minutes, or until the liquid is reduced to about half (about 1/4 cup).

Meanwhile, chop the sage. Whisk the sage and apricot spread into the sauce. Spoon over the pork.

---- o o o o ----
 

Olive Oil Potato Gratin
(from Cully's Kitchen)

1 cup shredded Romano cheese
½ cup extra-virgin olive oil
¼ cup panko bread crumbs
Salt and pepper
2 onions (halved and sliced thin)
2 garlic cloves (minced)
½ teaspoon thyme
1 cup low-sodium chicken broth
3 pounds potatoes (peeled and sliced ⅛ inch thick)

 
Preheat oven to 400F and lightly spray a 13x9 casserole dish with cooking spray.

Place 2 tablespoons of olive oil in a large skillet over medium heat, add the onions and season with ½ teaspoon salt, and ¼ teaspoon pepper. Cook stirring frequently until onions are browned. Add the minced garlic and ¼ teaspoon thyme and continue to cook until fragrant. Stir in ¼ chicken broth and continue cooking until broth is evaporated. Remove from heat and set aside.

In a large bowl while onions are cooking mix together the Romano cheese, 3 tablespoons olive oil, panko bread crumbs, and ½ teaspoon pepper. Set aside.

Place the sliced potatoes in a large bowl and toss them with 3 tablespoons olive oil, 1 teaspoon salt, ½ teaspoon pepper, and remaining ¼ teaspoon thyme.

Spread ½ of the sliced potatoes in the casserole dish and distribute the onion mixture evenly over the top followed by the other half of the potatoes. Pour the remaining broth over the potatoes, tightly cover with aluminum foil and bake for 1 hour.

Remove the casserole from the oven, remove the aluminum foil, and sprinkle the Romano cheese mixture over the top. Bake uncovered for an additional 15 – 20 or until cheese mixture is browned.

Sunday, January 31, 2016

dollar store dinner.


Back when I was in San Diego, I was a thrifty shopper. At the time, I was living with both my sister and my best friend. My paycheck had to stretch between paying the bills, covering a third of the rent, and grocery shopping. Suddenly, the dollar stores around me became an important resource and discounted groceries quickly lost its bougie stigma.

Luckily for me, I lived in California. Latin and Ethnic stores were aplenty and the discount dollar stores were surprisingly stocked with decent ingredients. My all time favorites would probably be the 99 Cent Only Store and Grocery Outlet.


Pan-Seared Chicken Drumsticks with Mushroom Gravy,
Cheesy Garlic Grits, and Pan-Roasted Asparagus

While Latin groceries like Northgate Market and Poncho Villa Farmer's Market were excellent places to pick up some cheap produce, I loved going to the 99 Cent Only Store for other produce that these markets didn't carry. Asparagus, shallots, garlic, and even surprisingly organic products could be found here along with a multitude of different spices. These stores were always clean, if a little overstocked, but never disgusting. And what other place could I stock up on candy and chocolates to my heart's content?

Grocery Outlet is probably my favorite out of the two. These stores almost always carried the "fancier" stuff. Cheeses galore, organic products, great produce section, fantastic frozen items, and wines and beers. I'd pick up my cheese tray stuffs here along with a couple of cornish hens, a bag of frozen salmon fillets, fancy bread, and flax milk (to name a few). They also had household items like bedding and a vast array of personal hygiene products, often brand names.


Here in Georgia, cheap produce is better at the local farmer's markets in Jacksonville and, at times, Walmart. I've only got a couple of discount stores in my area but I'm finding that I miss the selection that I was privileged to have when I was back in San Diego. With that being said, the Dollar Tree by my house isn't too bad. No produce but their frozen section has some interesting items in it.

The main thing that caught my eye were the frozen chicken drumsticks. Now, I have a perfectly fantastic butcher that I go to for all my meat-eating needs. However, I thought that it would be a fun experiment to see what kind of dish I could come up with by just using dollar store items. With a little browsing, I found most of the items I wanted to use for my "Dollar Store Dinner":
 
      - chicken drumsticks
      - white sliced button mushrooms
      - shallots
      - asparagus
      - polenta or grits
      - shredded cheese
      - fresh thyme
      - minced bottled garlic
      - low-sodium chicken broth
      - paprika
      - parsley
      - kosher salt
      - ground pepper
 
So what's my Dollar Store Dinner? It consisted of scoring and pan-searing the chicken legs with some thyme. I finished it in the oven then made a mushroom gravy with shallots and the drippings. For the side, I made some cheesy garlic grits and I ended up roasting the asparagus in order to attempt to salvage the fact that it was previously frozen. Note to self: NEVER buy frozen asparagus. Lol, too bad there isn't a 99 Cent Only Store around here! I definitely would've been able to get that fresh!

So, can you make a healthy meal from the dollar store? Oh, hell yeah! Enhanced with just a few fridge and pantry staples and you can get one rockin' dinner that's as good as any restaurant dish. Mmmm!

So, for this experiment: Successful!

Want more recipes like this? Check out The 99 Cent Chef whose whole blog is dedicated to taking the "haute out of cuisine" using ingredients that cost around 99 cents each, or 99 cents per pound. :)

Thursday, November 26, 2015

turkey part deux: wine-ing it up!


This year's Thanksgiving turned out waaaaaay less stressful than last year's over-achievement. I had written just a little blurb of what happened, but in reality, I was freaking out about how much to feed six people. Although that's really not something to panic about, I was really unsure of how much food to prepare since I had a skewed sense of portioning: during Thanksgiving, my parents make at LEAST seven dishes to feed their moderate family of SIX.

Turkey, bourbon ham, lumpia, rice, stuffing, meatballs . . . it was a labor of love that my mom and dad always looked forward to indulging during this time of year. What did that translate to? Feasting for days, of course! But when I applied that to last years cooking, I found people hardly ate at all. To my disappointment, my guests were too drunk to even enjoy (or appreciate) the veggie and cracker platter I put together for them to snack on.

On times like these, I miss my friends in San Diego. *sigh* I could always count on them to not only imbibe, but also to feast!

So this year, I decided that MY turkey day was going to focus on AFTER entertainment was over. I made food that me and the hubby were going to enjoy afterwards and didn't really care who was coming to dinner. . .

And wouldn't you know it . . . if the people from last year were too drunk to eat, these people were too full to eat! What the HECK!?! I never really understood why people eat before going to someone else's house to EAT. Isn't that the point of going to dinner? To EAT?! I was irked when the people we invited finally left . . . The point of making so much food was in order for them to enjoy it and they didn't even eat at all.

Ugh . . . Maybe it's a cultural thing.

My mother always taught me that if you went to someone's house, you had a plateful of food to satisfy hunger, but not gluttony. In other words, enjoy what was being served to you but not to the point where you were eating the whole banquet table. Even the parties that my aunties or uncles used to throw when I was younger had people enjoying food throughout the night until only a few dishes remained. People nibbled because food was prepared to be nibbled on. Isn't that what people are supposed to do if there's food set out for you to eat?

But enough of me whining. I'm just glad we didn't make anything else!

Speaking of whining, I decided to use wine for this year's turkey. I was tempted to use the apple-citrus brine from before, but I like the idea of having an ever-changing Thanksgiving turkey each year. So for this one, I decided to go with a white wine brine. I like that it's different from the orange and apple infused flavors that's popular around this time of year and instead uses plain ol' lemon for the citrus.

Another winning thing about the recipe was the fact that it didn't have a bajillion things to make the flavor profile. It was simple and sweet, and almost a no-brainer. :) I changed a few things based on what I had on hand and scaled down the recipe to fit my dinky nine pound turkey. Also, in order to speed up the process, I used ice instead of water courtesy of the automatic ice machine in my fridge (win!).

Oh, and did I mention that this was a pre-brined turkey? I made the mistake of brining one last year and it turned a tad bit salty (like ALMOST too salty). This year, I learned from my mistake and cut the salt called for in half. It still resulted in a slightly salty turkey, but then again, it might be due to the fact that it was sitting in brine for three to four days. It was still edible, but not like last year. As a precaution, I've halved the salt even further in the recipe below . . . just in case.

Despite that fact, this turkey turned out lovely. I paired it with a compound butter that mimicked the flavor profile to boost all the lovely flavors going on in the recipe. It was awesome. It was tasty. And there were so much leftovers for me to play with afterwords! Ha ha, suckers! Stupid guests . . . That's your loss!

---- o o o o ----
 

White Wine Turkey Brine (for pre-brined turkeys)
(adapted from Bobbi's Kozy Kitchen)

2 cups chicken stock
1/4 cup kosher salt
3 bay leaves
1 tbsp whole black peppercorn
1 1/2 tsp mustard seeds
1 bunch poultry bouquet (sage, rosemary, thyme)
2 cups white wine
1 large onion, thinly sliced
4 cloves garlic, crushed but left in skins
1 large lemon, sliced
1 tbsp white vinegar
4 to 5 cups ice
8.5 to 9 lbs turkey, giblets and neck removed

 
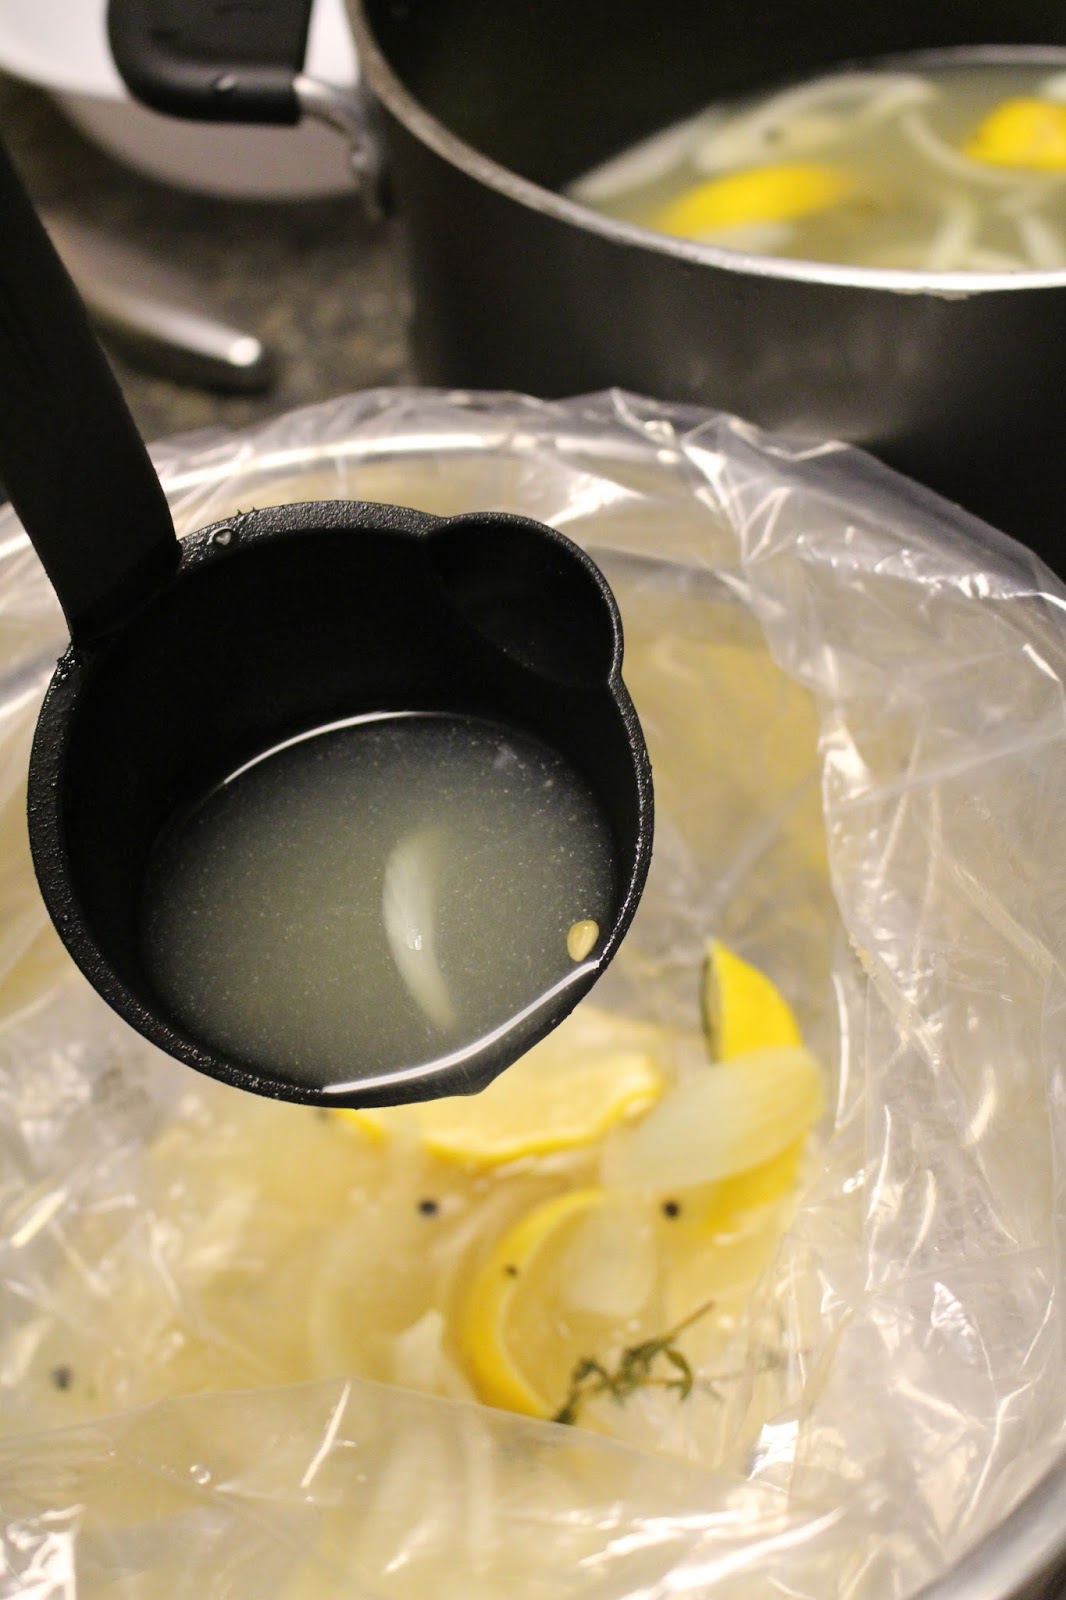
Bring the stock, salt, bay leaves, peppercorns, mustard seeds, and poultry bouquet to boil. Stir until salt is dissolved. Remove from heat. Pour in the wine, then add the onion, garlic, lemon, and vinegar. Stir in enough ice to cool mixture.


Place turkey in a large enough container to allow for bird to be fully submerged. Ladle some of the brine into container. Slowly lower in the turkey and continue to add brine until turkey is covered, making sure to stuff the cavity with a handful of herbs, onion, and lemon.

Close container and refrigerate for at least 24 hours up to 3 days. Remove turkey from the brine the night before cooking, pat dry, and place on a baking sheet in the refrigerator uncovered overnight. Bring turkey to room temperature before using a compound butter for roasting, about 1 to 1 1/2 hours.

---- o o o o ----
 

Herbed Compound Butter with Lemon and Garlic
(makes enough for a 10.lbs turkey)

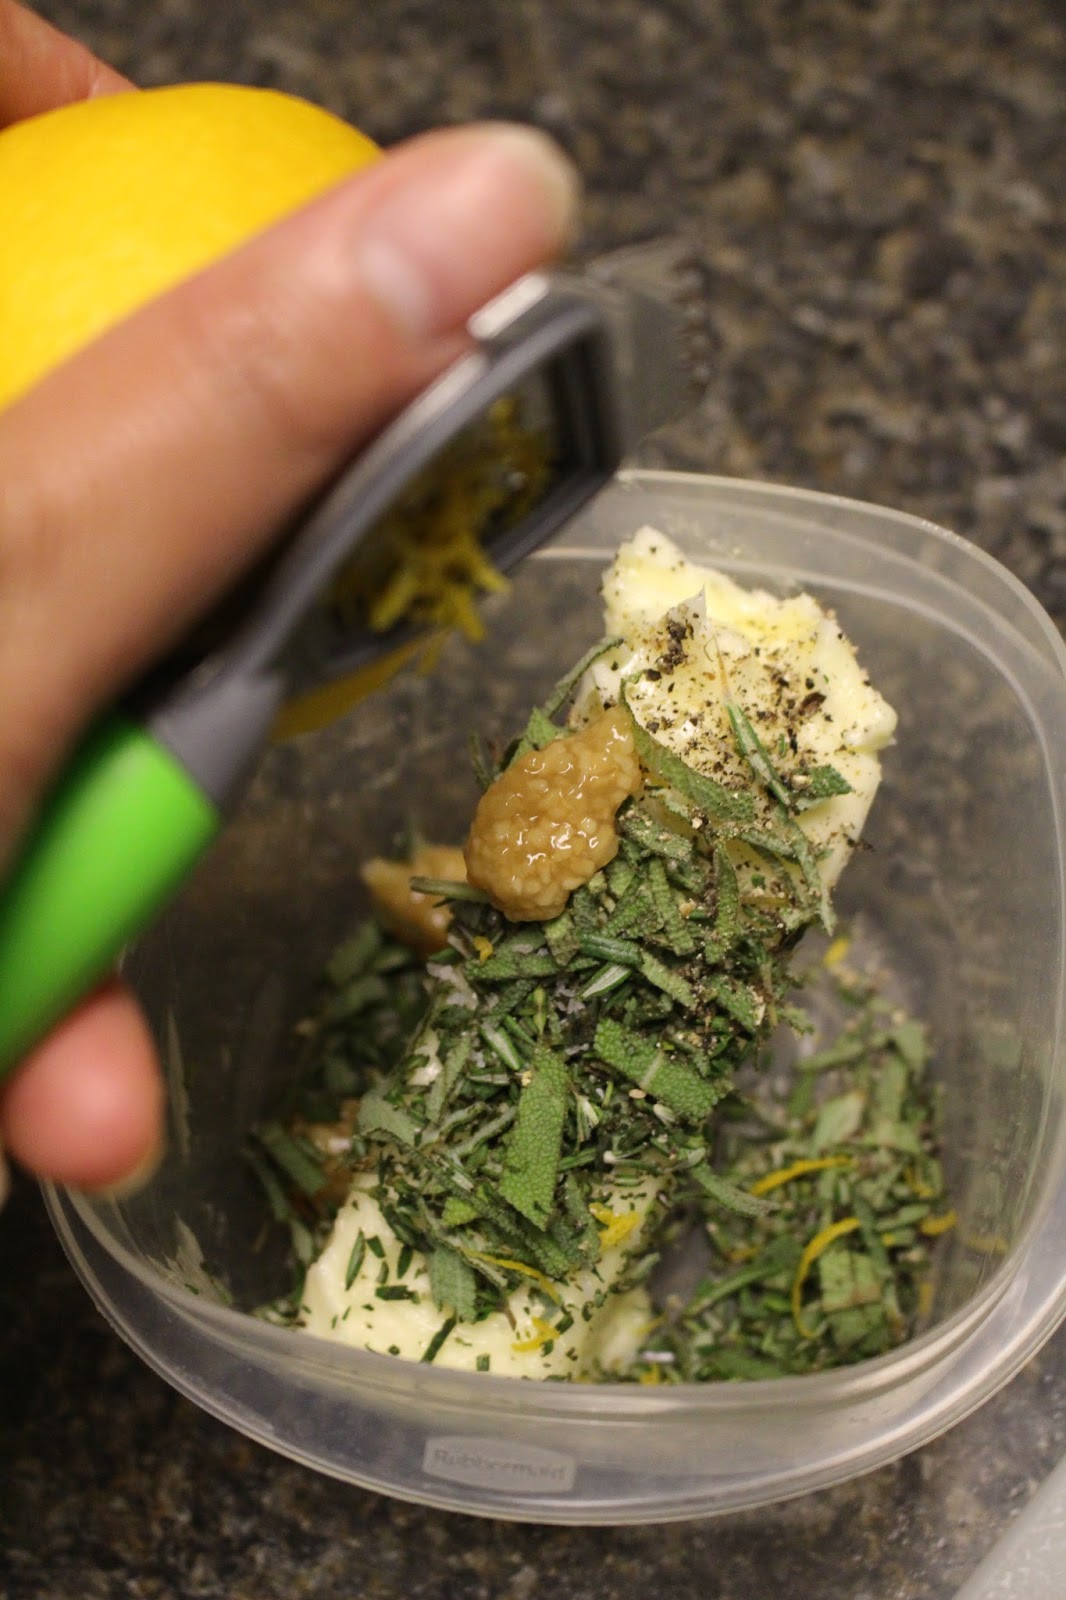
1/2 cup unsalted butter, room temperature
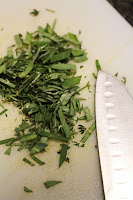
1 large sprig sage
1 sprig rosemary
1 sprig thyme
2 cloves garlic, minced
1/4 tsp onion powder
zest of half a lemon
pinch of kosher salt
pinch of fresh ground pepper

 
Rough chop sage and mince together rosemary and thyme. Add to butter. Add garlic, onion powder, zest, salt, and pepper. Mix until well combined then refrigerate for at least overnight before use. Bring to room temperature before applying to turkey.


To use compound butter:
When compound butter is at room temperature, position turkey on roasting rack. Carefully separate the skin from the breasts of the turkey. Spread butter over breast meat under skin until a thin layer forms. Slather additional butter onto the remaining areas of the turkey, as well as the inside cavity. Discard any leftover butter.

Loosely place some celery, carrot, and onion in the cavity of the turkey. Roast at 475F degrees for the first 30 minutes then at 325F for the remainder of the cooking time (fyi: an almost 9.lbs turkey takes around 3 hours to cook at this temperature). If skin starts to brown too quickly, cover problem areas with foil to prevent burning.

Cook to 155F degrees then let rest for at least 30 minutes. Bird will continue to cook and should reach a safe internal temperature of 165F degrees.

Monday, November 2, 2015

marinara part deux: makin' it fresh!


The plus side of living stateside is the fact that I have access to FRESH fruits and vegetables. In Guam, everything was oftentimes past it's peak or not readily available. And if it were available, it was gone in a blink of an eye. God, I missed vegetables. Even finding a good-tasting tomato was hard to find.

With that being said, I have made marinara sauce before using ingredients I had on hand. Although using canned tomatoes was convenient, I felt that I was cheating my inner chef. Inner thrifty home-maker was pretty happy with the results, but inner chef was screaming to work with fresher ingredients. Thankfully, with the abundance of farmer's markets like Freshfields Farm, Jacksonville Farmer's Market, and Camden Tomato House in derivable distance, fresh ingredients aren't hard to find. So, I decided to remake the marinara sauce again.

I knew that basic marinara sauce was primarily tomatoes, garlic, herbs, and onions. So, I looked through my pinterest board for some ideas and decided to use a combination of these three recipes. Mainly, using their major herbs and putting them in mine. Also, I wanted my sauce to have a kick of garlic . . . a nod to all things Italian, lol.

But not everything was farm fresh. Inner thrifty home-maker was tired of tediously mincing garlic by hand so a bottle of minced garlic was bought and stored in the fridge. With that being said, instead of bottle minced garlic, a substitution of 5 to 6 fresh garlic cloves would probably work.

In the end, I love how this sauce tastes. It's not as red as I'd like it to be, but the flavor is awesome! It's got a good amount of garlic, very tomatoey, and just the right flavor from the combination of herbs. If anything, I think I made too little. Can you imagine if I had made this during tomato season?? And inner chef? Definitely happy. :)

---- o o o o ----
 

Fresh Marinara Sauce
(adapted from Angie's Kitchen, Homemade Hooplah, and Tide and Thyme)

3 large vine ripe tomatoes, chopped
1/2 medium onion, finely chopped
1 tbsp bottled minced garlic
2 tbsp olive oil
1/4 tsp dried oregano
1/4 tsp dried thyme
1/4 tsp dried basil
1/8 tsp paprika
2 tbsp finely chopped italian parsley
salt and pepper
water, as needed*

 
In a large pan, heat olive oil over medium heat then add onion and garlic. Saute for a few minutes until fragrant and onion begin to soften. Add tomatoes, dried herbs, and paprika. Season with salt and pepper, then continue cooking until tomatoes reduce and sauce thickens (about 20 to 25 minutes. Stir in parsley and reseason as needed. Simmer for a further few minutes then serve.

*If sauce is too thick, add water as needed and reseason to taste.

Makes about 2 cups.