Saturday, March 19, 2016

southern fusion.


I'm still trying to get a hang of making pralines ever since the last time I made them successfully. Turns out, the sugar to milk ratios are pretty important to these little suckers. Too much milk and I get myself a caramel. And if they're not finicky enough, I can't just throw in anything or else they won't set properly. Right now, I'm still trying to figure out how to make almond butter pralines from the original recipe that I'm using.

However, I did successfully make some Mexican chocolate pralines! In an effort to make the praline a little more gourmet, I got the wacky idea to play around with flavor combinations. I've always loved chocolate and cinnamon together. Add a little bit of chile to it, and this flavor was exactly what I was looking for! I dusted these with a little sprinkle of cinnamon to make it extra fancy, but feel free to leave that out. I, on the other hand, like the extra boost of cinnamon!

---- o o o o ----

Mexican Chocolate Pralines
(adapted from Snapguide: Jada's DIY's & Recipes)

3/4 cup granulated white sugar
3/4 cup dark brown sugar
1/2 cup fat-free half and half or evaporated milk
4 tbsp light butter (cubed)
2 tsp pure vanilla paste or extract
1 1/2 cups roasted pecan pieces
1 tbsp dark cocoa powder
1 tsp ground cinnamon
1 tsp ancho chile powder
1/4 tsp kosher salt

 
Prepare a piece of non-stick parchment paper (about 12-15 in. long) and place on counter next to cooking station. In a small bowl, stir together cocoa powder, cinnamon, ancho chile powder, and salt. Set aside.

In a medium saucepan over medium heat, add both sugars and the milk into the pot and mix well with a wooden spoon until sugars dissolve. Dip a pastry or any kind of small cooking brush in cold icy water then brush the sides of the pot to melt away any sugar crystals that may have formed.

Put in your candy thermometer. Make sure the tip is not touching the bottom but is in the actual candy liquid. The mixture should begin to froth at this point. Cook the candy, stirring occasionally, until it reaches it's proper temperature of 240F degrees.

Turn the heat completely off and take it off the burner. Add in the butter, vanilla, cinnamon mixture, and chopped pecans.

Stir mixture until it becomes thick and start to turn opaque. When the candy starts to hold together, quickly spoon it onto the parchment paper. Make sure to not over crowd and make them touch, otherwise the pralines will dry stuck together. Sprinkle with additional cinnamon to garnish, if desired.

Let the pralines set at room temperature for 30 min. Afterwards, if not serving right away, store in a air-tight container for up to 2 to 3 days. Makes about 9 to 12 pralines.

Sunday, March 13, 2016

light and filling.


Roasted Vegetable Hummus Plate: Just a quick dinner with roasted eggplant and butternut squash on light, creamy hummus. A dash of sumac and parsley then drizzled generously with olive oil. Add some sliced naan and a simple salad to the side and you have yourself a mighty tasty dinner indeed.

Sunday, March 6, 2016

triumph: creamy pecan pralines.


Last night, I had a hankering for pralines. I don't know what triggered it, but I went online and tried to see if I can get some shipped to my house. Holy crap, were they expensive! Just a small tin from my favorite praline store, Savannah Sweets, ran about $30! Granted, I could just drive down to St. Augustine in Florida to go to onne of their stores, but I didn't really feel like driving an hour and some minutes just to get candy. And anyway, it was also the middle of the night.

My only other option? Well, I guess I can make them myself.

But I remember all too well what happened the last time I tried to make pralines . . . they were a disaster. Okay, well "disaster" might not be an accurate term. But I still messed them up, no matter how tasty they were anyway. So this time around, I opted to try a different recipe that I found before that had lots of good visuals in the tutorial. Boy, did they help! Not only was I able to see how to mix the ingredients, but the author also had video on the consistency of the candy! There was no way I would be able to mess this up!

And guess what? I made an almost perfect batch of pralines! Huzzah!


How could I have made this better? Surprisingly, just a couple of things. For one thing, I found them to be a tad sweet. The original recipe called for 1 cups each of white and brown sugar. I could tell already that that was going to be too sweet for me. So I reduced the amount to 3/4 cup each, but I still found them too sweet. Next time I make these, I'm going to further reduce the brown sugar to maybe 1/2 a cup and see where that is.

The other thing I was slightly unhappy about was with the fact that the pralines slightly bloomed. The trick for avoiding bloom (in other words, the sugar from crystallizing), is to make sure that all the sugar crystals melt in the cooking process. So, since I didn't really follow the directions and use a brush to get the crystals on the side, that affected my candy's appearance. Thankfully, they stayed creamy and didn't get crumbly and hard.

Other than that, I'm super happy with the way I made these. And a bonus? I used light butter and fat-free half and half and it still worked! Not only that, I used roasted and salted pecan pieces from Kahler Pecan House down the road. The pecans really made a difference! It was just enough salt to balance out all that sugar. The pralines themselves were melt-in-your-mouth and creamy despite the lighter butter and dairy used. As for me, all I can say is, yay, I found my prefect praline recipe! :D

---- o o o o ----

Creamy Pecan Pralines
(adapted from Snapguide: Jada's DIY's & Recipes)

3/4 cup granulated white sugar
1/2 to 3/4 cup dark brown sugar
1/2 cup fat-free half and half or evaporated milk
4 tbsp light butter (cubed)
2 tsp pure vanilla paste or extract
1 1/2 cups roasted and salted pecan pieces*
      (*or substitute with: 1 1/2 cups roasted pecan pieces and 1/4 tsp kosher salt)

 
Prepare a piece of non-stick parchment paper (about 12-15 in. long) and place on counter next to cooking station.

In a medium saucepan over medium heat, add both sugars and the milk into the pot and mix well with a wooden spoon until sugars dissolve. Dip a pastry or any kind of small cooking brush in cold icy water then brush the sides of the pot to melt away any sugar crystals that may have formed.

Put in your candy thermometer. Make sure the tip is not touching the bottom but is in the actual candy liquid. The mixture should begin to froth at this point. Cook the candy, stirring occasionally, until it reaches it's proper temperature of 240F degrees.

Turn the heat completely off and take it off the burner. Add in the butter, vanilla, and chopped pecans.

Stir mixture until it becomes thick and start to turn opaque. When the candy starts to hold together, quickly spoon it onto the parchment paper. Make sure to not over crowd and make them touch, otherwise the pralines will dry stuck together.

Let the pralines set at room temperature for 30 min. Afterwards, if not serving right away, store in a air-tight container for up to 2 to 3 days. Makes about 9 to 12 pralines.

Thursday, March 3, 2016

curry in a hurry.


Whenever I go to the bookstore, I almost always hit up the bargain book section. Call me a cheapskate, but I love me a discount. Especially if it's a cookbook! Now, I know that most of the bargain cookbooks out there are crap, but I love finding one that has a variety of recipes, a nice layout, lots of pictures, and (most importantly) has actual GOOD tasting recipes.

Surprisingly, I found that in Food Lovers: Simply Chicken. The cookbook's divided in three sections with the main course sub-divided even further into types of preparation. The ingredient lists for the recipes were actually surprising; it can call for everyday pantry items to harder to find ethnic ingredients. Instructions are clear and straightforward with approximate cooking and prep times with a picture for every recipe in the the book (which I like, since I'm one of those people that need to see what it's supposed to look like in the end).

Another interesting thing about the book was the variety of recipes it had. It had everything from chicken noodle soup, to chicken korma, to pad thai, to paella. I love the global scope of the recipes and I feel like I can actually successfully make each and every one! For $5.00, this was a great deal!

So, If this was a chicken cookbook, why does it look like I have fish in my curry?? Well, because it is fish. :) A recipe has to be adaptable, in my opinion. Just because it's a chicken cookbook, doesn't mean I have to necessarily use it exclusively for that protein. So when I tested a couple of recipes in the book for different proteins, it passed with flying colors! One such recipe was a "Chicken Curry with Broccoli".

Now, I love me some curry, be it Indian, Thai, what have you. This book has several interesting curries that I'm dying to try out. For "Chicken Curry with Broccoli", I decided to experiment and make it into a fish curry instead (See?! I'm turning pescatarian, I tell you!).

This curry turned out amazing! Going by the ingredient list, I'm guessing this is supposed to be Thai-inspired. The shrimp paste and lime really worked together with the coconut milk to give you that tell-tale Asian flavor. The original recipe actually called for actual chili peppers, but since I didn't have any, crushed red pepper flakes from McCormick made a fine substitute.

And actual kaffir limes? Pfft! Bottled lime juice, my friend, and some regular limes did the trick. Also, since I'm Filipino, I used spicy bagoong for the shrimp paste. From start to finish, this took all of 30 minutes for lick-the-plate-clean goodness! Huzzah for a quick weeknight dinner!

---- o o o o ----

Fish and Vegetable Curry
(adapted from Food Lovers: Simply Chicken)

For the Curry Paste:
1/4 to 1/2 tsp crushed red pepper flakes
1/2 tsp minced garlic
1 tsp minced ginger
1 tbsp bottled lime juice
1 tsp spicy shrimp paste (spicy bagoong)

For the Curry:
4 to 5 (5.oz) skinless white fish fillets, about ⅓-inch thick (cod, flounder, catfish, etc . . .)
1 large red onion, sliced
2 scallions, chopped
2 bell peppers, sliced (orange, yellow, and/or red)
1 lbs. broccoli, cut to florets
2 tbsp vegetable oil
3/4 to 1 cup coconut milk
3/4 to 1 cup low-sodium chicken broth
1/2 tbsp grated ginger
salt and pepper, to taste
1/2 a lime plus more for garnish

 
Make the paste:
Put all curry paste ingredients into a small bowl and mix well. Set aside

Make the curry:
In alarge pan, heat oil and saute the onion, broccoli, and bell peppers. Add the curry paste and the scallions, sauteing briefly. Add the coconut milk and chicken broth then simmer for 2 to 3 minutes.

Stir in the grated ginger then top with the fish fillets. Let cook, turning the fish once, for 8 to 10 minutes or until fish is done. To finish, squeeze 1/2 a lime over the curry then season with salt and pepper as needed.

Serve with rice and an additional wedge of lime for garnish. Makes about 4 servings.

Note: If the gravy is too thin, add a little cornstarch with water to achieve desired consistency.

Wednesday, March 2, 2016

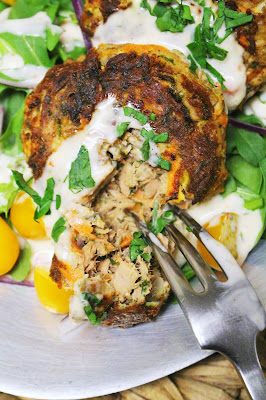
patty, cake, or burger?


I've been slightly pescatarian lately. I don't know if it's because of laziness or if it's because I'm trying to eat healthier. All I know is that I've been eating a lot of fish as of late and I don't know when it's going to stop.

Take these tuna burgers, for example. I could very well have baked or pan-fried some chicken to put on my salad, but canned tuna seemed way easier and more interesting to make. I liked that I could put veggies in my protein and that it was going to take me 10 minutes to make. See what I mean? Lazy or healthy?

When I made these patties (or is it cakes? or is it burgers??), I was originally going to make an actual burger like the title suggested, but I didn't really have any bread in the house. So instead, these "burgers" turned into patties that topped some spinach and arugula. I added some tomatoes for sweetness and slivers of red onion for bite. To finish this off, I made a thin, spicy ramoulade that doubled as a topping for the patties and a dressing for the salad.

Would I make these patties again? Maybe. When I made them, I knew that they were going to be slightly dry (which they were). I think if I added more breadcrumbs so that it had a slightly more cakey consistency, they wouldn't be so bad. Despite that, the flavors were actually quite tasty so I might play around with the recipe and see if I can improve the texture. Until then . . .

---- o o o o ----

Tuna Burgers
(slightly adapted from Spright)

2 (5.oz) cans chunk light tuna, drained
2 eggs, beaten
2/3 large carrot, grated
1/2 green onion, sliced
1 tbsp nutritional yeast or parmesan cheese
1 tbsp Italian seasoning
1 tbsp dried parsley
1 pinch cayenne powder
2 pinches of salt
2 pinches of pepper
4 tbsp olive oil
2 tbsp plain bread crumbs

 
Combine all ingredients except the olive oil in a medium bowl; mix with a fork or your hands until all ingredients are evenly distributed. Using your hands, take small handfuls of the mixture and form them into patties.

Pour the olive oil into a medium-sized pan and bring it to medium heat. Once the oil is hot, place the patties in the pan.

Cook each side of the patties for 4-5 minutes, turning them over carefully with a spatula or tongs. Place on a paper towel for a few minutes on each side to drain excess oil then serve.