Sunday, January 31, 2016

dollar store dinner.


Back when I was in San Diego, I was a thrifty shopper. At the time, I was living with both my sister and my best friend. My paycheck had to stretch between paying the bills, covering a third of the rent, and grocery shopping. Suddenly, the dollar stores around me became an important resource and discounted groceries quickly lost its bougie stigma.

Luckily for me, I lived in California. Latin and Ethnic stores were aplenty and the discount dollar stores were surprisingly stocked with decent ingredients. My all time favorites would probably be the 99 Cent Only Store and Grocery Outlet.


Pan-Seared Chicken Drumsticks with Mushroom Gravy,
Cheesy Garlic Grits, and Pan-Roasted Asparagus

While Latin groceries like Northgate Market and Poncho Villa Farmer's Market were excellent places to pick up some cheap produce, I loved going to the 99 Cent Only Store for other produce that these markets didn't carry. Asparagus, shallots, garlic, and even surprisingly organic products could be found here along with a multitude of different spices. These stores were always clean, if a little overstocked, but never disgusting. And what other place could I stock up on candy and chocolates to my heart's content?

Grocery Outlet is probably my favorite out of the two. These stores almost always carried the "fancier" stuff. Cheeses galore, organic products, great produce section, fantastic frozen items, and wines and beers. I'd pick up my cheese tray stuffs here along with a couple of cornish hens, a bag of frozen salmon fillets, fancy bread, and flax milk (to name a few). They also had household items like bedding and a vast array of personal hygiene products, often brand names.


Here in Georgia, cheap produce is better at the local farmer's markets in Jacksonville and, at times, Walmart. I've only got a couple of discount stores in my area but I'm finding that I miss the selection that I was privileged to have when I was back in San Diego. With that being said, the Dollar Tree by my house isn't too bad. No produce but their frozen section has some interesting items in it.

The main thing that caught my eye were the frozen chicken drumsticks. Now, I have a perfectly fantastic butcher that I go to for all my meat-eating needs. However, I thought that it would be a fun experiment to see what kind of dish I could come up with by just using dollar store items. With a little browsing, I found most of the items I wanted to use for my "Dollar Store Dinner":
 
      - chicken drumsticks
      - white sliced button mushrooms
      - shallots
      - asparagus
      - polenta or grits
      - shredded cheese
      - fresh thyme
      - minced bottled garlic
      - low-sodium chicken broth
      - paprika
      - parsley
      - kosher salt
      - ground pepper
 
So what's my Dollar Store Dinner? It consisted of scoring and pan-searing the chicken legs with some thyme. I finished it in the oven then made a mushroom gravy with shallots and the drippings. For the side, I made some cheesy garlic grits and I ended up roasting the asparagus in order to attempt to salvage the fact that it was previously frozen. Note to self: NEVER buy frozen asparagus. Lol, too bad there isn't a 99 Cent Only Store around here! I definitely would've been able to get that fresh!

So, can you make a healthy meal from the dollar store? Oh, hell yeah! Enhanced with just a few fridge and pantry staples and you can get one rockin' dinner that's as good as any restaurant dish. Mmmm!

So, for this experiment: Successful!

Want more recipes like this? Check out The 99 Cent Chef whose whole blog is dedicated to taking the "haute out of cuisine" using ingredients that cost around 99 cents each, or 99 cents per pound. :)

Friday, January 29, 2016

striving for perfection.


So, ever since we got to Georgia, I've been adapting a more Southern-style of cooking. I think it's because I'm surrounded by that kind of food environment and it just seems to make sense to cook that way. Even my eating habits are turning Southern: The polenta that I used to cook all the time turned to grits, hummus makes a rare appearance in my fridge, and I seem to be buying a whole lot more butter. Because of this, I've switched to light butter to make myself feel better.

Speaking of grits . . . I was surprisingly having a hard time trying to make a decent pot of grits. I just assumed that using my favorite polenta recipe would be fine but it's surprisingly NOT. The texture is off, especially for shrimp and grits, and it's much stiffer than I wanted it to be. I've tried several different recipes, and each time I get closer and closer to my ideal pot of grits.

Today yielded success.

My perfect grits? Always savory that that specific mouth texture. These grits are exactly how I want them: soft and fluffy with just a bit of tightness and texture. While they aren't flavored with anything specific, per se, they're still flavorful and taste like grits. The best part? Even if you put it in the fridge, they stay the same consistency even when you reheat it the next day! Yay!!

For the shrimp, I decided to make it more in the Françias-style of cooking. So fancy, I know . . . but not really! Thanks to my recent binge-fest of an old series of Jacques Pépin: Fast Food, My Way, I've been taking some notes and renewing my love of French cooking. It's kind of like Southern cooking but with a more funny accent, lol.

I like how in one episode, Monsieur Pépin added some chopped mushrooms to his shrimp casserole so that it'll soak up the shrimp flavor. He also did a ragù with tomatoes and onions similar to this recipe, but much more reduced. And man, does that man use a lot of olive oil!!

So, taking ideas here and there, voilà ! Shrimp and grits, my way. :D I did forget to add some peas to the shrimp, though. I think that would've made it über-françias, along with some oil-cured olives as a garnish. Eh, c´est la vie ! No? :) Bon appétit!

---- o o o o ----

Creamy Garlic-Tomato Shrimp
(makes 4 servings)

24 pcs jumbo shrimp (peeled, deveined, and butterflied)
2 tbsp bottled garlic
1 tsp Old Bay seasoning
1 tsp onion powder
1 tsp paprika
4 tbsp olive oil
1/4 tsp ground pepper

1/4 cup olive oil
1 bunch (about 8 sprigs) fresh thyme
1/2 cup finely chopped shallots
1/2 cup finely chopped white button mushrooms
1 to 2 pcs thick sliced deli ham, finely chopped
1/2 to 3/4 cup chopped grape tomatoes
1/4 cup low fat half and half
1/2 cup chopped parsley
low sodium chicken stock, as needed
salt and pepper, to taste

 
Marinate the shrimp:
Combine shrimp, garlic, Old Bay seasoning, onion powder, and paprika. Add olive oil to moisten the shrimp then season with ground pepper. Chill for a minimum of 2 hours up to overnight.

Make the shrimp:
In a large pan, heat 1/4 cup olive oil with the bunch of thyme. When the oil is fragrant and hot, add shrimp (reserve any leftover marinade) and cook until lightly browned on both sides (about 6 minutes). Remove shrimp from pan and set aside; discard the thyme.

In the same pan, add shallots, mushrooms, and ham. Season with salt and pepper. When vegetables start to brown and the ham becomes slightly crisp, add the tomatoes and any leftover marinade from the shrimp. Reduce heat and cook until tomatoes break down to a paste (about 10 minutes).

Return shrimp to the pan and toss to incorporate. Stir in half and half and parsley. Cook until thickened, about 2 minutes, then add chicken stock to thin as needed.

To serve, portion out 6 shrimps per person and top over grits or pasta with additional parsley and a drizzle of extra virgin olive oil for garnish.

---- o o o o ----

My Perfect Grits
(makes 4 to 6 servings)

1 cup coarse ground grits or polenta (white or yellow)
2 3/4 cups water
1/4 cup fat free half and half
1/2 tsp kosher salt
1 to 2 tbsp light butter
1/4 tsp dried parsley
ground pepper, to taste

 
Bring water, half and half, and salt to boil. Slowly stir in grits/polenta, reduce heat to low, then cover. Cook 15 to 20 minutes or until thickened, stirring occasionally. Remove from heat. Stir in butter and parsley, then season with pepper to taste.

For Savory Cheese Grits: Stir in 1/4 to 1/2 cup shredded cheese, 1/4 tsp onion powder, a dash garlic powder, and a dash smoked paprika to cooked grits.

Thursday, January 21, 2016

tea, made strong and spicy.


Lately, I've been on a chai schtick. That warm, spicy tea is the perfect solution to the biting cold we've been having as of late. While any hot drink would've been fine, chai has always been my go-to for whenever it gets cold. What can I say? I've been in love with chai ever since the first time it's ever touched my lips.

Since I love chai so much, I find that buying a cup or two (or three!) a day started to get pricey. And when we moved to Guam and no decent tea house was in sight, desperate measures called for making my own chai at home. Thankfully, I was able to find key ingredients like cardamom on the island and decided to make my own "instant" version using several different recipes as a guide.

While the convenience of adding hot water to the "instant chai" was great, I found that getting spice sludge at the bottom of each cup was unappetizing. Even with a fine sieve, granules of cardamom, cinnamon, and pepper drifted to the bottom, soaked up the water, and formed a layer then went in my mouth, ruining those last few sips of the chai that I could've enjoyed. Not only that, the use of highly processed non-dairy powder and instant tea really bothered me . . . what was I really drinking?

When we got back state-side, I once again had access to coffee and tea houses. I drank chai steeped from actual tea leaves and it was heavenly! But those places are still hard to get to since we're currently in a small town and I find myself confined instead to store-bought bags of chai packets. After the last purchase I made and finding it lacking in both taste and flavour, I decided it was time to make my own.

I like my chai spicy. With lots of pepper and cinnamon, a good amount of cardamom, and enough licorice to round out the flavors. So when I was hunting for a recipe, this was a great starting point. I tinkered with the spice portions to suit my taste and added a bay leaf and star anise for good measure. I'm not a fan of nutmeg, so I swapped that with some allspice instead.

This turned out lovely. The spice was strong, but not aggressively so, with just the right amount of bite. The added vanilla extract made this aromatic in the best way and I loved that I knew what went in this chai. No weird chemicals, no weird powders, just spices, tea, and a good amount of milk. THIS is what good chai tastes like!

---- o o o o ----
 

Spicy Masala Chai
(adapted from Lands & Flavors)

For the Masala:
10 to 12 tbsp strong black tea leaves (Ceylon or Irish Breakfast)
6 cinnamon sticks
15 pods green cardamom, seeds only
1 tsp whole cloves
1 tbsp black peppercorns
1 1/2 teaspoons fennel seeds
5 whole allspice berries
1 pod star anise

For the Chai:
1 cup evaporated milk, half and half, or thick coconut milk
1 1/2 cups water
2 inch piece of ginger, sliced
1 large bay leaf
sweetener, to taste
1 tbsp vanilla extract
1/4 tsp salt

 
Combine tea and spices and coarsely grind to make masala. Place in cheese cloth or coffee filter and tie off the ends with kitchen twine to make a bag. Set aside.

Add milk, water, ginger, and bay leaf in a 2 quart saucepan and bring to a boil on medium-high heat. Once the milk comes to a boil, add the masala bag, sweetener, vanilla extract, and salt. Reduce heat to medium-low and simmer chai for 10 to 15 minutes, stirring often to prevent the milk from scorching.

After the chai has steeped, remove from heat and strain chai with a fine sieve. Serve hot with a stick of cinnamon in mugs or in glasses over ice. Bring remaining chai to room temperature before storing in the fridge to keep for up to a week.

Wednesday, January 20, 2016

rollin' for breakfast.


I had some leftover ready-made pizza dough sitting in the fridge so I decided to try and make some breakfast rolls this morning. I was tempted to make something sweet, but the need for a savory breakfast in the morning decidedly won out. Plus, the recipe sounded interesting and I was in the mood for eggs anyway.

Reading through the recipe, this seemed simple enough. I decided to add more spices and onion to the filling to make these rolls more flavorful. I didn't have any breakfast sausage so I swapped it with some thick-sliced deli ham. Then, all I did was roll out the dough, layer on the fillings, and bake that sucker for 30 minutes. Yum!

I do wish my rolls were more big and fluffy, though. But that's more my fault than anything, really. If I had used a similar dough like the kind called in the recipe, I'm sure I would've gotten big, fluffy rolls as well. As for the taste, they were pretty good! Nice and savory especially with all that onion added in. I do wish that I had more cheese in these rolls, though, so next time I'm doing the full one cup. So would I make these again? Definitely!

---- o o o o ----
 

Breakfast Rolls
(adapted from The REAL Housewives of Riverton)

1 pkg ready-made pizza dough
4 eggs
1 tbsp milk
1/4 cup Italian parsley, chopped
1/2 tsp garlic powder
1/2 tsp onion powder
1/4 tsp paprika
salt and pepper, to taste
1 clove garlic, minced
1 small onion, chopped
1/2 green pepper, chopped
2 to 3 slices ham, chopped
1/2 to 1 cup shredded cheese
olive oil

 
Preheat oven to 400F degrees.

In a bowl or a glass measuring cup, combine egg, milk, parsley, and spices. Season with salt and pepper, to taste, and beat together until well combined. Set aside.

In a large skillet, drizzle some olive oil and saute garlic, onion, and bell pepper until slightly browned. Pour egg mixture over the contents of the pan. Let the eggs cook for up to a minute or until the bottom starts to set, then flip by sections. Repeat the flipping every few seconds until the eggs are firm but still moist. Remove from heat, transfer to a plate, and set aside.

Roll out dough to 1/4 inch thick rectangle. Sprinkle on egg mixture, chopped ham, and shredded cheese. Roll tightly, pinching the ends together, then cut into even 12 sections with a sharp knife. Transfer to a well greased pan and bake for 20 to 30 minutes until golden brown.

Makes 12 rolls.

Friday, January 8, 2016

chocolate covered failures.


Yesterday was a very trying day. From the moment I woke up to the time I went to bed, nothing I did seemed to go right. Ever have one of those days?

It all started when I woke up later than I wanted to. 10 am, not too bad. just enough time to make some shrimp and grits for breakfast. That idea turned out to be a disaster. Ingredients were flying everywhere, things weren't tasting like they should, and the whole thing wasn't worth the effort it took to make . . . and I usually make a decent shrimp and grits. So after taking longer that I wanted in the kitchen, I was running behind for my shower. And since I was behind on taking a shower, The hubby came home right when I got out and we had an errand to run that day during his lunch break. So, that snowballed for a while until we got home.

When we finally got home later that we should've, I decided to go back into the kitchen and de-stress. I figured that the best way to do that was to finally make some Southern pralines. This recipe seemed easy enough and, since I wanted my pralines to be chewy, perfectly fit what I was looking for.

Problems started arising when I realized that I didn't have the right ingredients. Well, that was no biggie since I always sub a lot of my cooking with this or that. Heavy cream was a major ingredient in the recipe and I didn't have any. What I did have, however, was a big ole box of store brand, powdered skim milk from a recipe I tried a while back. So, not only was I subbing CREAM with NON-FAT dairy, I was using a CHEAP substitute POWDER to boot. Needless to say, I was wondering if this was a bad Idea after all.

I pushed on, though, despite my reservations. Despite adding too much vanilla, adding salt, and misreading the recipe. By the time I realized that I had missed the final step of stirring the pot to crystallize the boiling sugar, my concoction was beyond making pralines . . . it had cooked into caramel.

At this point, I reached the "I-don't-give-a-fuck-anymore" mode. My pralines were ruined, I wasted my precious Georgia-grown pecans my sister gave me, and I hadn't even gotten dinner ready. All the failures seemed to accumulate to this point and I was just not having it. However, I wan't so far gone that I still didn't want to salvage what was left on my counter.

Off I went to Walmart and purchased a couple bars of Cadbury's Dairy Milk and a single Lindt's White Choclate bar. I proceeded to melt the chocolate down and mix it with some coconut oil to help temper the chocolate. Then one by one, I covered the pralines-turned-caramels first in the milk chocolate, then drizzled it with white. When I ran out of the milk for dipping, I used the white instead.

In the end, my hopes for pralines were just a distant memory. I've since found a good tutorial for my next attempt on making these confections. While these milk chocolate pecan turtles turned out to be an adequate consolation, it still is a far cry to what they were supposed to be. Failure is failure, no matter how you look at it. *sigh*

But, what better way to fix failure than to cover it with lots of chocolate?

Tuesday, January 5, 2016

taste it and make it: bulgogi sandwich!


When the hubby and I were still in Guam, there were a few eateries we found that got into our usual meal rotation. Our top three were definitely Katre's Bistro, Pika's Cafe, and surprisingly, Dr. Kabob (a Greek fast food joint). Pika's Cafe, though, would probably be the best "farm-to-table" restaurant the island has. Their moto and menu revolved around the phrase, "Buy local, eat local, support local!".

With that, Pika's Cafe also had a revolving seasonal special and a bunch of unique items on their standard menu. The hubby's favorite was definitely their Korean BBQ Sandwich. In the past month, I've heard the hubby lament several times on the loss of acess to that particular sandwich. Every time we passed the Asian isle on the grocery store, he would comment with "I miss Pika's" . . . which meant the sandwich, of course, lol.

I figured I'd give him a surprise!

Enter, my version of the Korean BBQ Sandwich! Since he was missing the sandwich so much, I thought that I would try and replicate the sandwich as close as I could. I knew that it had bulgogi marinated beef, with kimchi-style pickled vegetables, and cucumbers. It also had a chili mayonnaise.

Knowing was half the battle . . . It's the execution that was the problem. In mine, I decided to sub the beef with chicken. It was lighter than beef (I wanted to get away from heavy foods for the time being) and I thought it would be easier to marinate. Also, I didn't have any beef in the fridge anyway which was another big factor, lol.


For the marinade, I decided to go with this recipe but adapted it slightly to include minced apples and sliced onions. From what I read on the web, one of the traditional ingredients to add was either Korean pears or kiwi. Well, since I had neither, I subbed with Golden Delicious apples instead (since that was what I had in the pantry). After making the chicken, I ended up with quite a bit of marinade left. I decided to cook it down and made it into a sauce for the chicken afterwards.

The kimchi recipe was something that I was pleasantly surprised to find. I thought that I would have to put my ingenuity to the test, but apparently someone had already used theirs. I love that this uses regular cabbage and ingredients I already had on hand ("emergency kimchi" indeed!). In traditional kimchi, a coarse ground red pepper called gochugaru is commonly used. However, I've also seen a few recipes call for a fermented chili paste called gochujang to be used instead of the gochugaru. Well, I decided to go with the flavor notes of the gochujang since this would be quickly pickled to be used the next day. That way, I would have the taste of a long fermented kimchi without actually waiting. :)
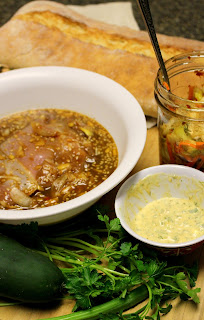
During the taste testing, I found that this kimchi had a lot of heat to it. So, I nixed the chili mayo that I was originally going to make. Instead, I decided to use some of the leftover chimichurri, mixed with some ketchup and mayo, to make an aioli out of that (secret sauce, baby!). It has a lot of acidity so I thought it would help imitate the "pickled" part of the sandwich. With the ciabatta, kimchi, chicken bulgogi, aioli, and cucumbers all ready to go, my sandwich was ready to be assembled!

This turned out better than I hoped! It had the same savory, sweet, and spicy flavors the Pika's sandwich had. The only drawback was that the sandwich was messy to eat. The chicken made the whole thing a little bulky and the "take-and-bake" ciabatta bread I bought was a tad bit too chewy. The sauce made from the marinade also made this messy, but I think it wouldn't be the same without it. And the kimchi? Everywhere.

Next time, to reduce the messy factor, I'll get a softer ciabatta and cut the bread so it'll envelope the fillings more. Also, I'll toss the chicken in the sauce first and shake off any excess. That way, I'll still get some of the sauce on the chicken. But man, this was one of my favorite experiments!! Oh, by the way, the hubby LOVED the sandwich. Although it wasn't Pika's Cafe's Korean BBQ Sandwich, he thought it was a damn good substitute. :D Now, back to the drawing board . . .

---- o o o o ----
 

Korean Chicken Bulgogi
(slightly adapted from Meg's Everyday Indulgence)

2 to 3 pcs boneless chicken thighs

For the Marinade:
1/2 a Korean pear, apple, or kiwi, minced
1/2 a small onion, thinly sliced
3 tbsp soy sauce
1 tbsp lemon juice
1 tbsp brown sugar
1 tbsp honey
1 tbsp rice wine, mirin, or cream sherry
1 tbsp sweet chili sauce
1 tbsp sesame oil
1 tbsp minced garlic
1 tbsp white vinegar
1 tsp grated ginger
1 tsp toasted sesame seeds
1/4 tsp black pepper

 
Mix the marinade ingredients in a bowl until the sugar has dissolved. Add chicken and toss well to coat. Cover and marinate for a minimum of 30 minutes up to overnight in the fridge.

To cook, preheat a skillet over medium high heat. Add the chicken, reserving the marinade. Cook until chicken is cooked through and slightly caramelized, taking care not to burn. If needed, add the reserved marinade by tablespoon when the pan gets dry. Garnish with sliced scallions and toasted sesame seeds. Serve with a side of kimchee.

---- o o o o ----
 

Quick Emergency Kimchi
(slightly adapted from Maangchi)

2 lbs green cabbage, cut into thin 2-inch strips
1/2 a small onion, thinly sliced
1 cup cold water
1/4 cup kosher salt
1/3 cup hot pepper flakes
1/4 cup fish sauce
1/4 cup minced garlic
1/3 cup (3 to 4 stalks) chopped green onion
1/4 cup julienned carrots
1 tbsp sugar
1 tbsp soy sauce
1 tsp ginger

 
Place cabbage in a large bowl and add cold water and kosher salt. Mix well with hands to properly salt cabbage. Set aside for 10 minutes. Make a paste with the remaining ingredients.

After the cabbage has soaked, wash and rinse the salted cabbage in cold water a couple of times then drain well. Return the cabbage to the bowl and mix the paste into the cabbage thoroughly.

Put the finished kimchi into a container, jar, or plastic bag. Press the top of the kimchi down with your hands to protect from exposure to too much air.

Refrigerate for at least 30 minutes before serving or eat right away like a salad. Alternately, keep at room temperature a few days to ferment if desired.